Nesting AI - Automation with n8n
Nesting AI: Automation with n8n
In recent months, the explosive emergence of ChatGPT and related tools has reinvigorated the internet. Yet, for the average user, after an initial phase of experimentation and delight, most will swiftly revert to their usual workflows, promptly relegating these tools to the recesses of their memory. This behavior is typical among my parents and friends. The reasons are twofold: the inconvenience and cost associated with linking to GPT-related applications due to various network issues and, on the other hand, the genuine inconveniences posed by AI applications.
ChatGPT and its derivatives indeed heralded automation, replacing simple laborious tasks. However, the cost of this convenience is the relative complexity of these tools’ utilization processes. For instance, composing an email requires opening a GPT tool, locating the appropriate prompt, and after several modifications and responses, finally obtaining the desired text fragment. For most users, this process is hardly economical. Many would prefer to endure the inconvenience momentarily rather than deviate from their ‘work inertia’ and familiar working methodologies.
As someone who enjoys tinkering, I’ve given considerable thought to this phenomenon. Today’s story starts with the essence of tools, combining the series of automations I’ve implemented using APIs recently, and explores my personal insights on how to effectively utilize AI and keep pace with this industrial revolution.
Quick Read:
- How new productivity tools are adopted
- My approach to automated work
- Personal outlook
(Many of the ideas in this article may be unrefined, and I welcome criticism and correction)
Productivity Tools
For a tool to gain widespread adoption and even break into mainstream circles, design considerations often transcend the tool itself, delving into deeper analyses of ‘scenarios’ and ‘customer groups’. If a tool aims to replace certain elements of an existing workflow, most people will naturally weigh its benefits. The criteria for such assessments consider the gains offered by the new tool. If ‘learning cost < efficiency enhancement brought by the new tool,’ people will be inclined to learn and use it.
Here’s a simple analysis based on the time taken for tasks using old and new tools. If ‘new tool time + learning cost < old tool time,’ it implies ‘a little learning can lead to significant efficiency gains.’
Let’s assess some positive cases. In the previous era, tools with minimal learning costs, such as Markdown and Excel, were the first to be widely adopted. They brought convenience to document and spreadsheet management. Despite advanced usage methods, their overall low learning cost directly translated into substantial efficiency improvements. Therefore, even those less adept at learning eagerly invested time to grasp these tools.
Other tools, with relatively higher learning costs, offered significant long-term benefits, such as git, Latex, and Obsidian, which I frequently use. Compared to some intuitive graphical interface tools, these are not as straightforward to learn. However, once mastered, I believe they can deliver considerable long-term benefits, hence my effort to learn and master them.
Some tools may not offer dramatic efficiency improvements, but their ‘painless’ and ‘accessible’ nature presents opportunities. Notion, flomo, Xmind, for instance, were initially released as ‘small and beautiful’ exquisite products. Starting with simple concepts and designs, they attracted users with their extremely low learning costs and then expanded their functionalities based on existing tool ecosystems, evolving into new-era efficiency tools.
(The above theory does not apply to some special products; sometimes, people use ‘incomprehensible imagination and action’ to develop and learn tools, like ‘creating illustrations with Diffusion’)
So, for making a good tool, I believe there are two important dimensions:
- Reduce learning costs
- Simplify design
- Provide detailed manuals
- Seamless integration into existing work environments
- Enhance efficiency
- Customized design, identifying the entry point
- Automation
As a deep user of AI-related tools, I currently do not believe AI can completely replace my work, and the efficiency gains have not met my expectations. More precisely, AI tools lack stability; repeating the same question sometimes yields varying degrees of correctness. But in areas of strong generality and flexibility, AI remains highly valuable. So how can standalone AI products be integrated into one’s workflow?
API: A Bridge Between Isolated Tools
Long ago, I had hoped to integrate tools for convenient ‘All in One’ solutions. The result was a fusion of tools that became increasingly cumbersome and unwieldy. After much toil, I gradually abandoned this approach. Now, I use Obsidian and Notion for note-taking, TickTick for task management, and Cubox for clip management (all quality products from the Minority Store). Disassembling the tools transformed many ‘complex scripts’ into ‘direct demands.’ Although work did become somewhat simpler, these tools lacked a certain spark. However, there are viable methods for tool interconnectivity. Here, I introduce a category of tools that have recently emerged on the internet: API-based automation platforms.
Zapier: Luxurious Automation
Zapier and IFTTT, as industry leaders in this product type, were also the first automation products I encountered. They offer a wealth of features:
- OAuth2 and various types of login authentication
- Automatic data interfacing
- Automatic processing of loops and branches
- Automatic retry on request failure
……
There are many in-depth tutorials on Minority, for example:
- Notion’s Automation Transformation: A First Attempt with Notion x Zapier
- I implemented a P.A.R.A knowledge management workflow using Notion/Cubox/HiFlow/TickTick
So, I will not go into detail here. These tutorials use APIs to automate, interconnecting different products. Originally, ‘logging completed tasks from TickTick into Notion’ required manual handling. Now, with API automation tools, upon task completion, the API automation platform can automatically update and record data in Notion, saving users time and ensuring data reliability.
These API automation management tools are excellent, but they share a common drawback: they are expensive (or perhaps that’s my shortcoming…). Let’s compare the prices of such products:
| Product | Price |
|---|---|
| Zapier | Free for 100 tasks monthly. Upgrade for HK$159.11/month for 750 tasks |
| IFTTT | Free for a few Applets. Upgrade for HK$20/month for 20 Applets |
| JiJianYun | Free for 500 executions monthly. Upgrade for ¥1990/year for 1500 executions monthly |
| HiFlow (Tencent LightLink) | Free for 1000 executions monthly. Upgrade for ¥980/year for 3000 executions monthly |
From a personal perspective, I fully support the entrepreneurial spirit of innovative internet companies. But no matter how you look at it, these prices seem rather steep. Especially for Zapier, which falls into the category of a luxury good. After exploring various options, I finally found a ‘usable and free’ alternative.
n8n: The Open-Source Automation Console
n8n, a tool that facilitates easy automation with a clean design and a graphical interface that clearly depicts the flow of data between various internet products. It offers an abundance of templates and active community support.
Although n8n’s pricing is not cheap—€20 per month for just 5 Workflows—its open-source nature is its saving grace. Self-hosting incurs no additional expenses.
Project address: n8n(Github.com)
When installing, I recommend using docker-compose for ease of future updates and configurations.
1 | |
The directory contains four files. Perform the following operations:
- .env (mandatory): Open and edit three sets of usernames and passwords. The first two pairs are for the database, and the last set is for browser login.
- docker-compose.yml (optional): Open and edit the n8n environment. If you have a domain name for your server, it’s recommended to bind it. Using an IP address also works. After line 35, add
- N8N_HOST="[domain name or IP]". For example, if I purchased a domainxxx.site, I would add- N8N_HOST="xxx.site". Do not add http or https. Feel free to change ports if needed. - README.md, init-data.sh (do not modify): Keep as is.
Then execute:
1 | |
Fix on 2023-08-26, docker-compose update
After upgrading to version 1.0, there were some issues with the previous docker-compose solution. Here is an updated version (I prefer the updates in the nightly, but you can adjust according to personal preference):
Note: [ ] content needs to be manually changed, four places in total, including 2 domain names, username, and password
1 | |
Successful deployment is thereby achieved. Since n8n is still an immature product, frequent updates and deployments are necessary. The docker-compose method offers some convenience. When accessing [server domain or IP]:5678, the last set of login credentials edited in .env will be used.
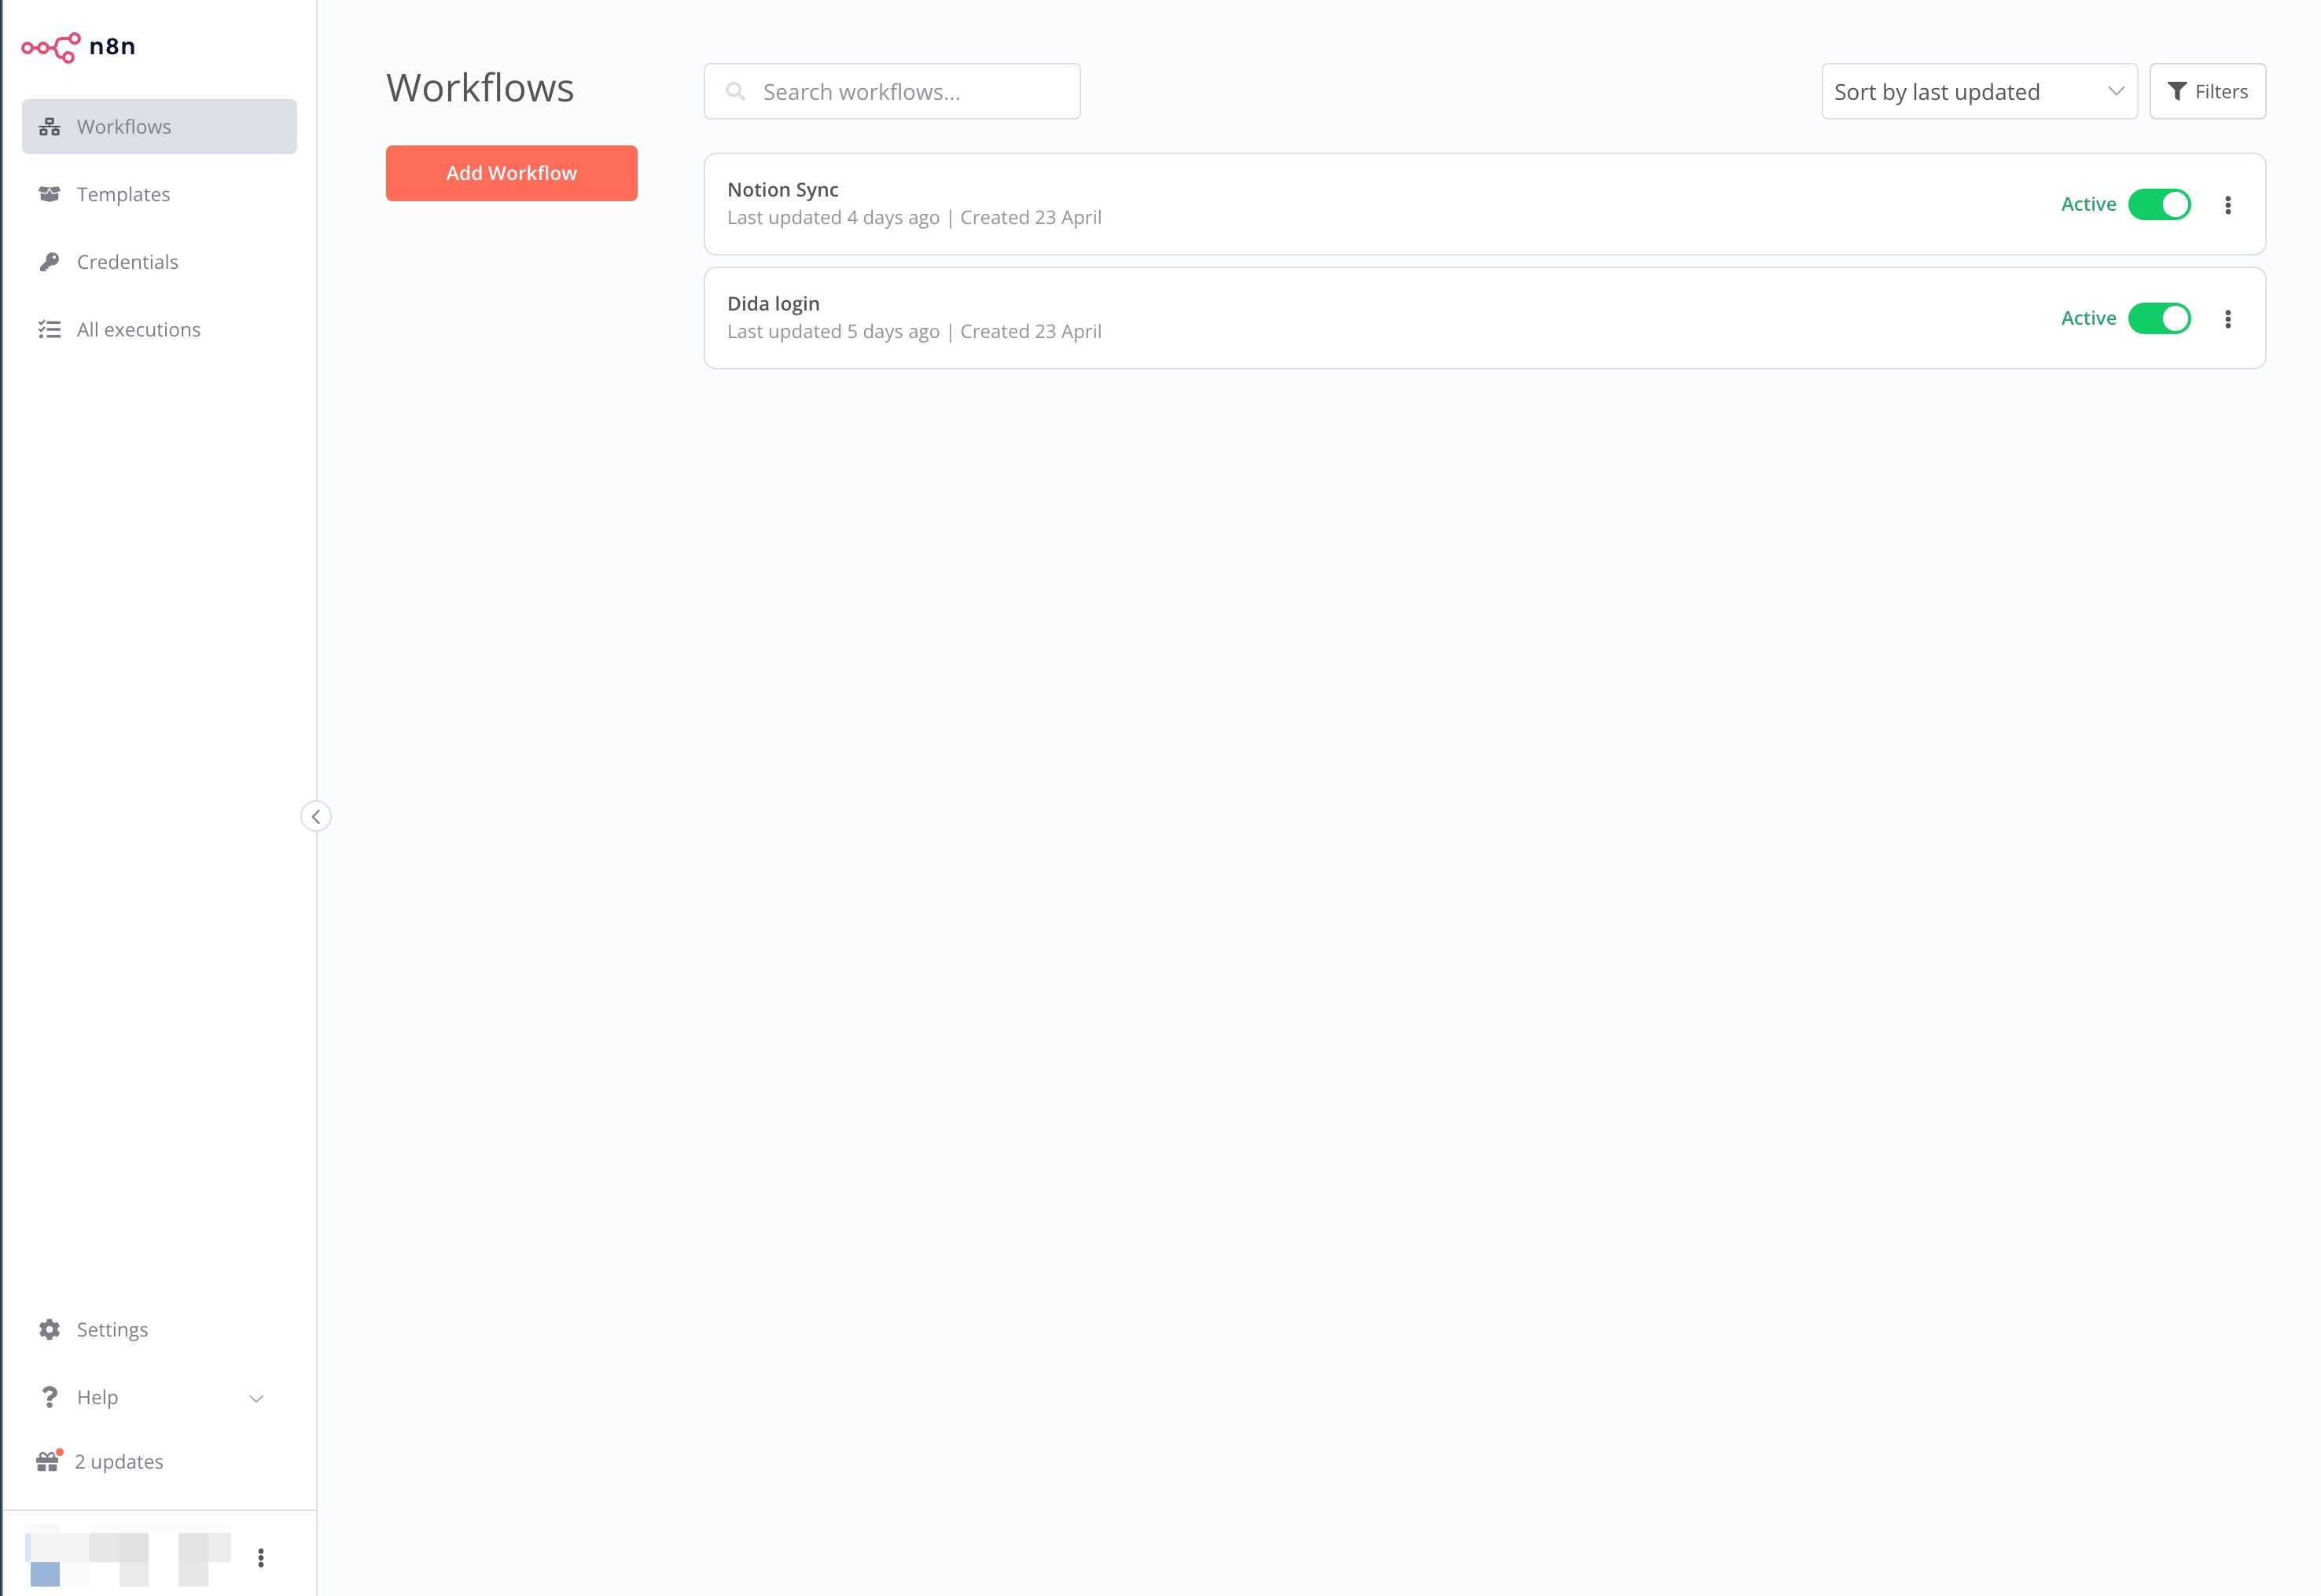
The management interface is very straightforward, with the left side featuring:
- Workflows: Manage each automation task you’ve edited
- Templates: Existing community templates that can be pulled and used directly
- Credentials: Manage your authentication information
- All executions: Records of executions that have taken place
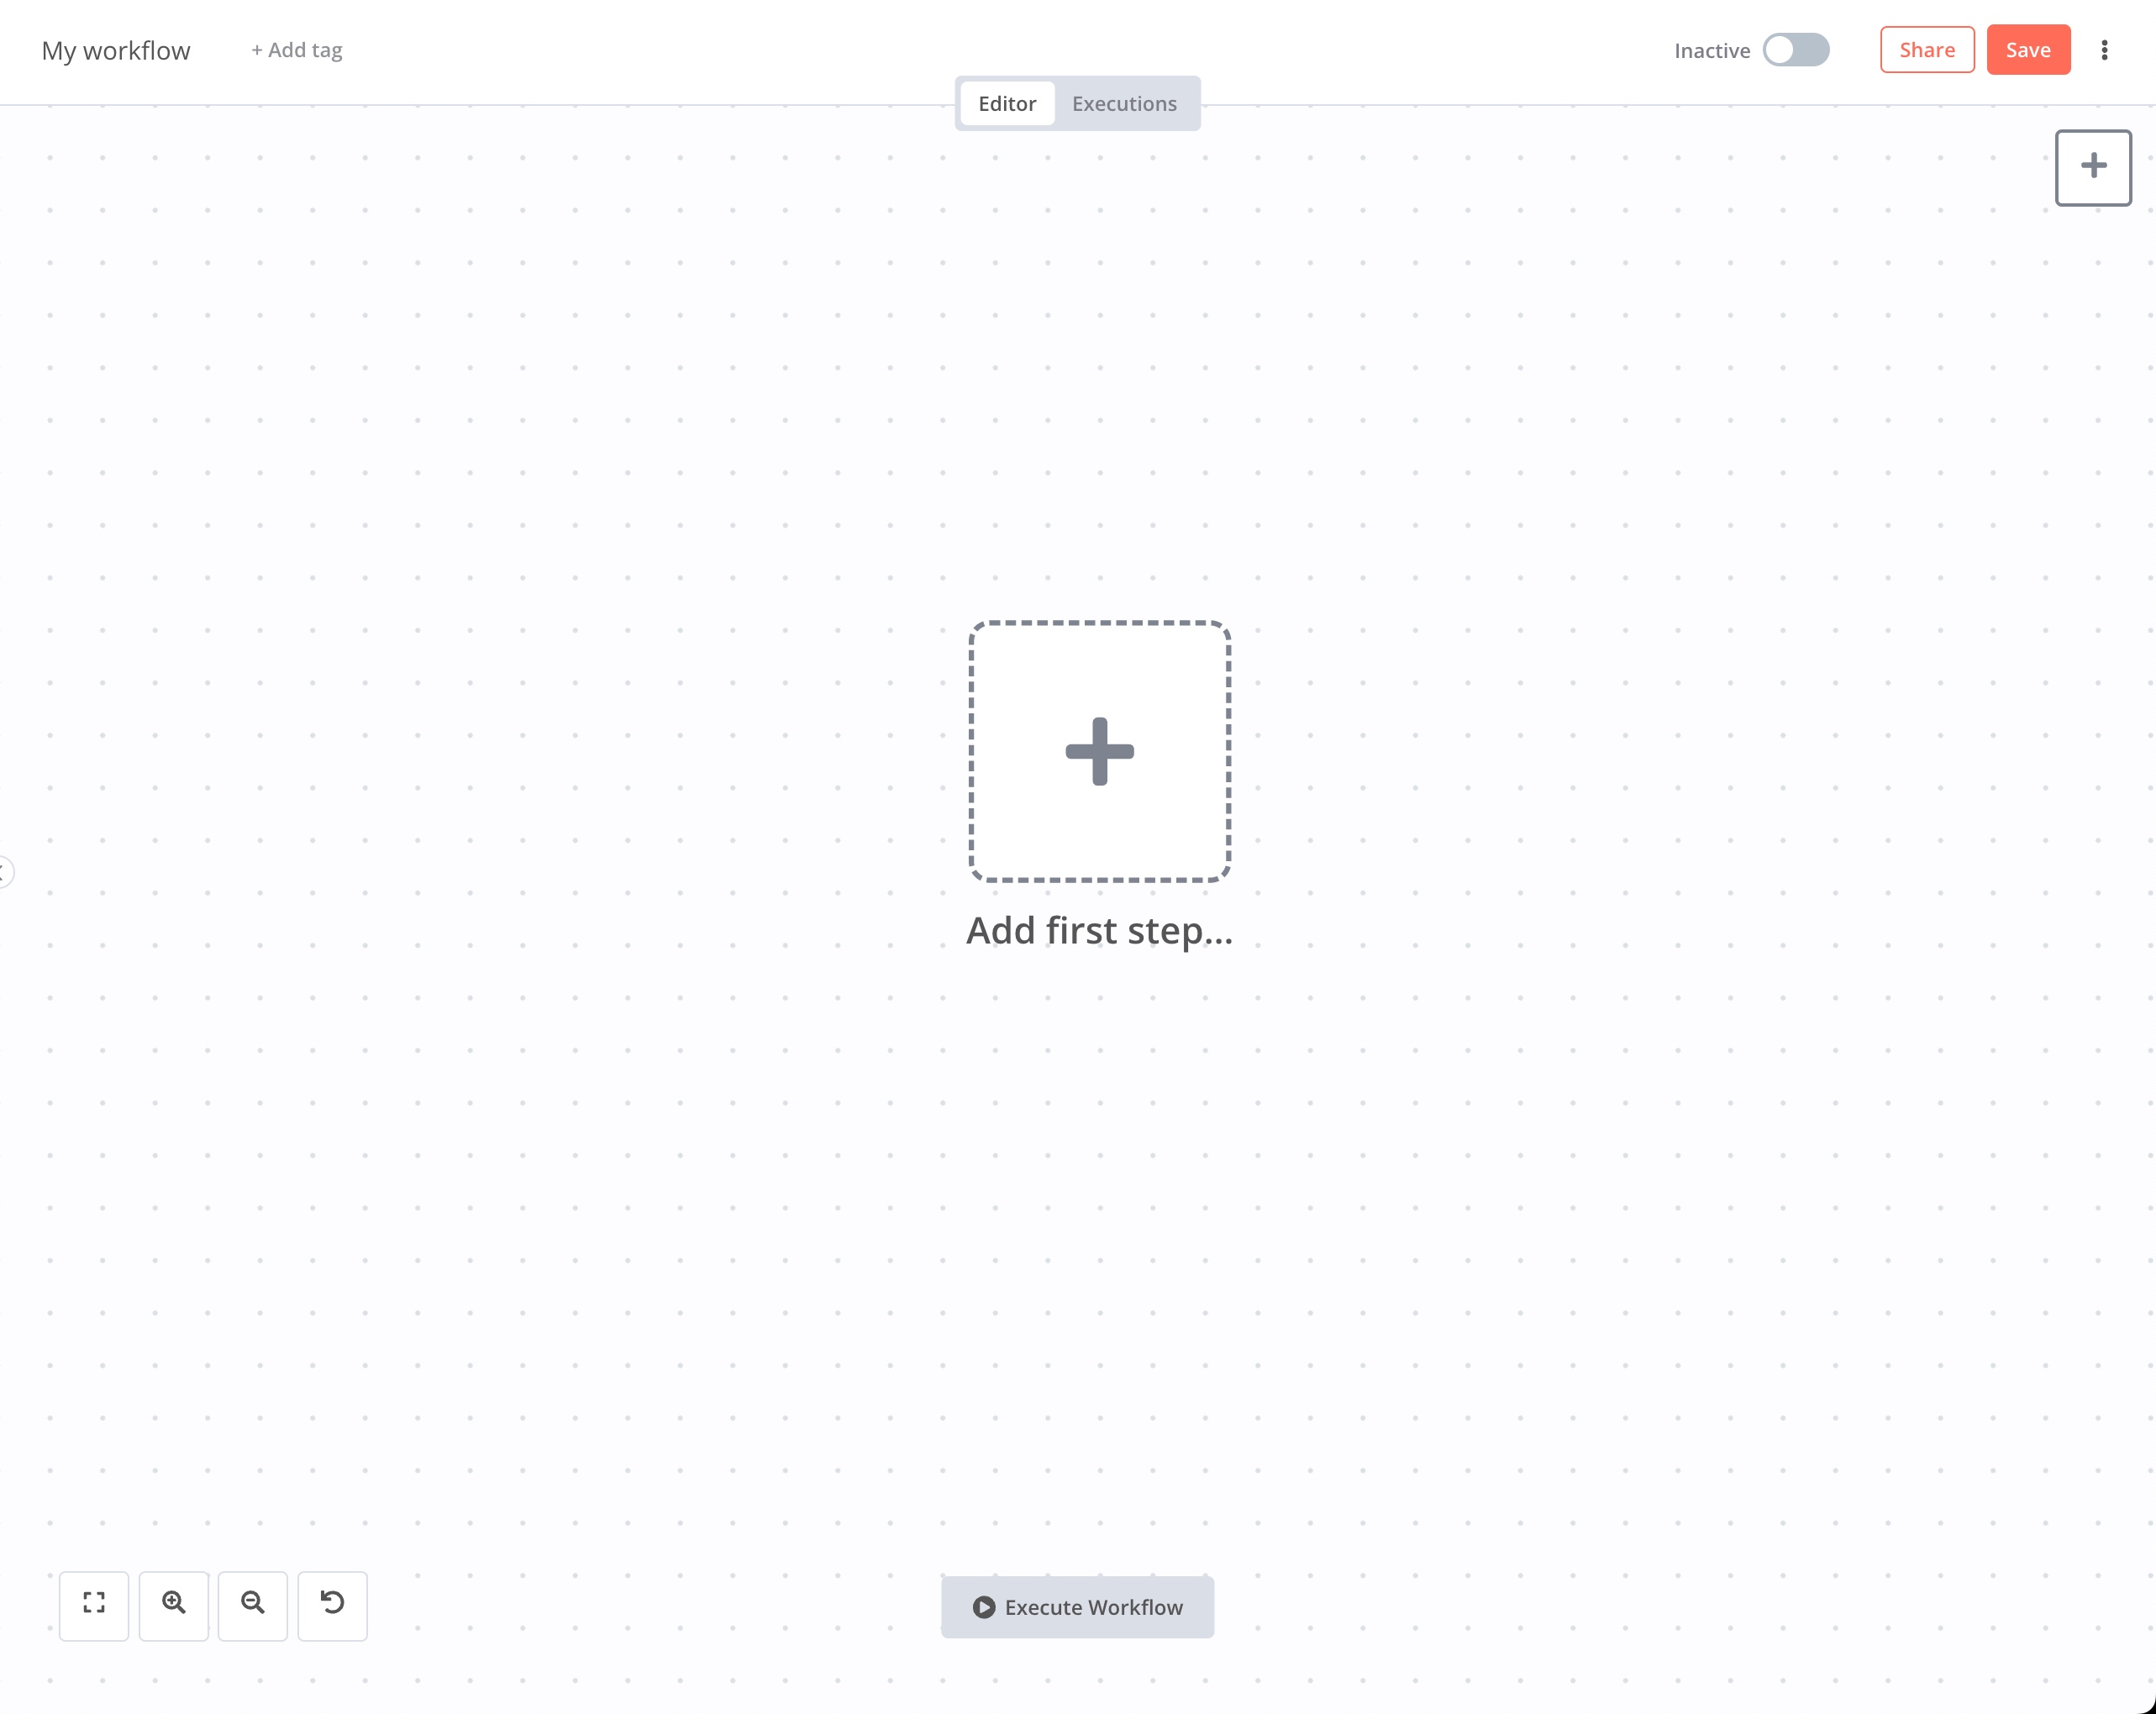
Next, clicking ‘Add Workflow’ allows you to create a new workflow. Before we get started on our work, let’s briefly introduce the two most important elements within a Workflow.
Triggers and Nodes
A Trigger is the starting point in a Workflow. Once activated, the subsequent processes are executed. A Workflow can contain multiple triggers.
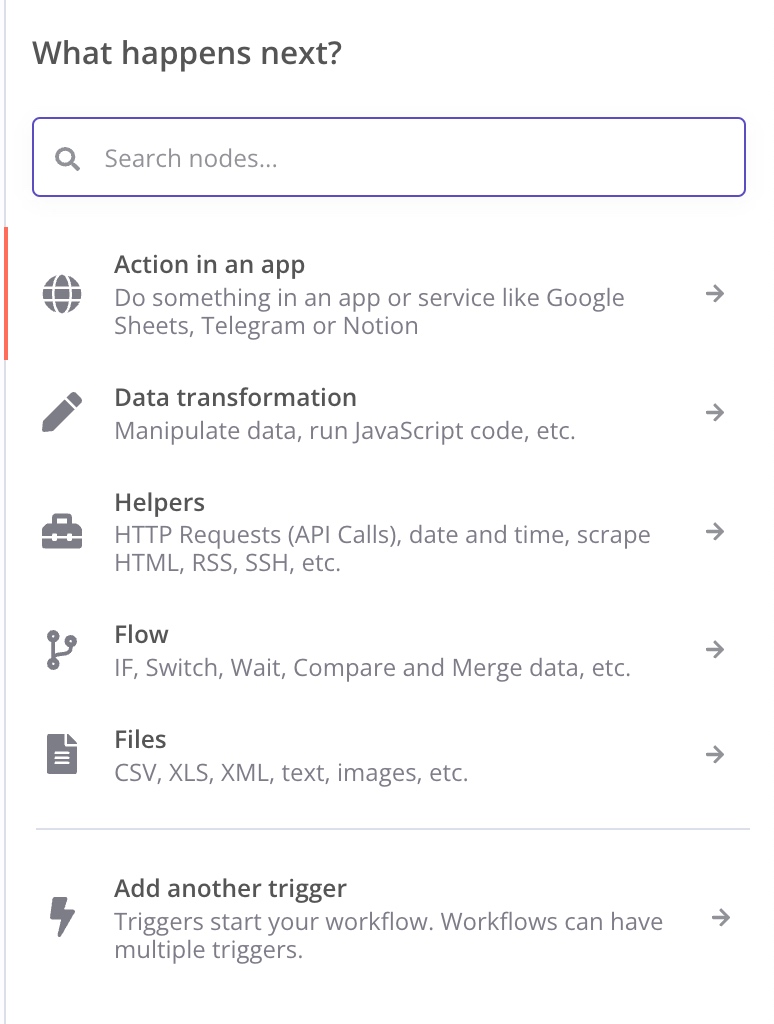
Upon entering a new Workflow, the first step is to add a starting point, i.e., a Trigger.
Triggers come in several types:
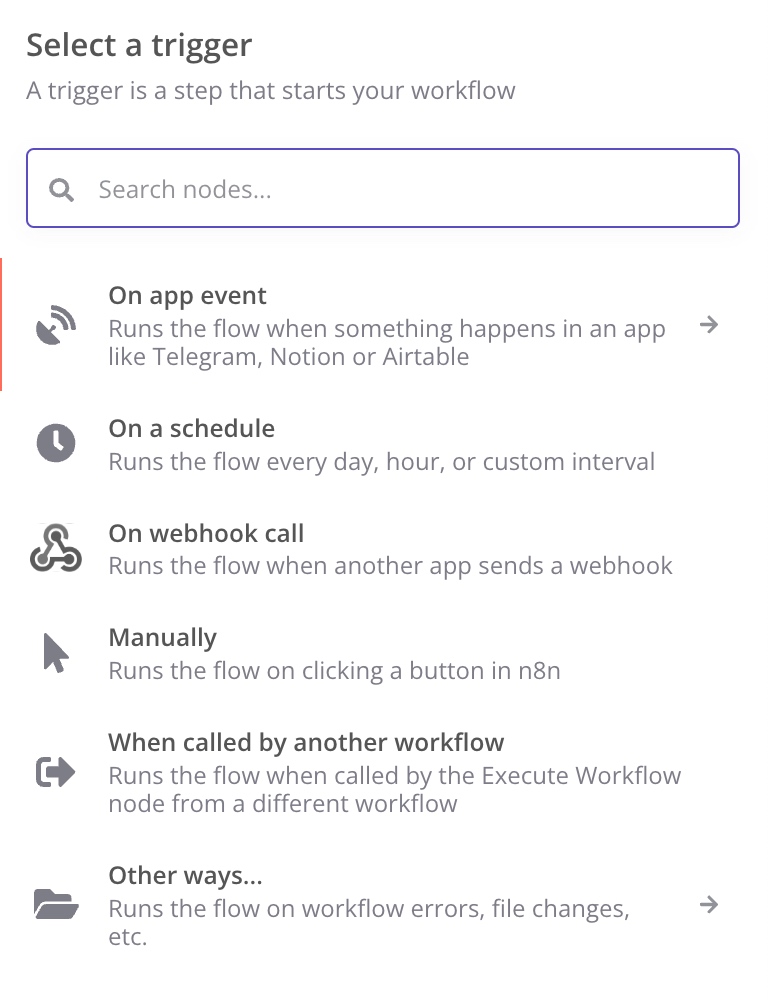
- On app event: Triggers an app’s transaction. Due to n8n’s ongoing development, many apps are not yet supported.
- On a schedule: Timed triggers.
- On webhook call: Triggered via webhook, which means sending an HTTP Request from another app.
- Manually: Less commonly used, manual triggering.
- When called by another workflow: Triggered by invocation.
- Other scenarios: For special case handling.
These triggers cover the vast majority of applications.
Nodes follow the triggers; after activation, each node’s instructions are executed in sequence:
There are various types of nodes, which you can explore according to n8n’s documentation. I’ll introduce a few nodes below that we’ll use later.
The most important node is the HTTP Request node:
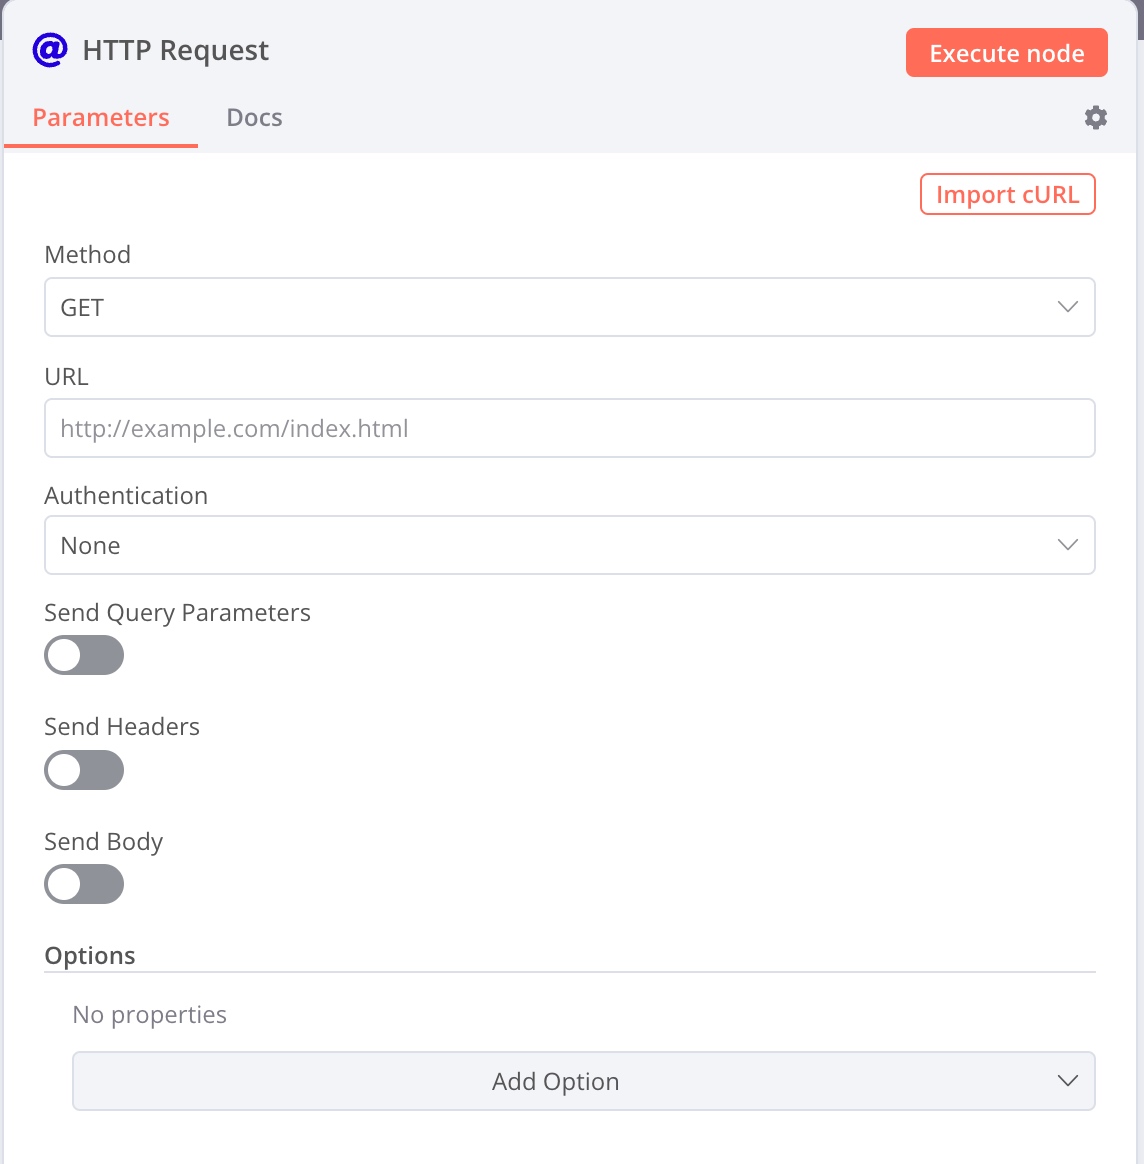
You can set URL, Query Parameters, Headers, and Body. It’s also possible to use json data. If you’re unfamiliar with HTTP Request, you can convert a cURL copied from the browser developer mode directly into an HTTP Request node.
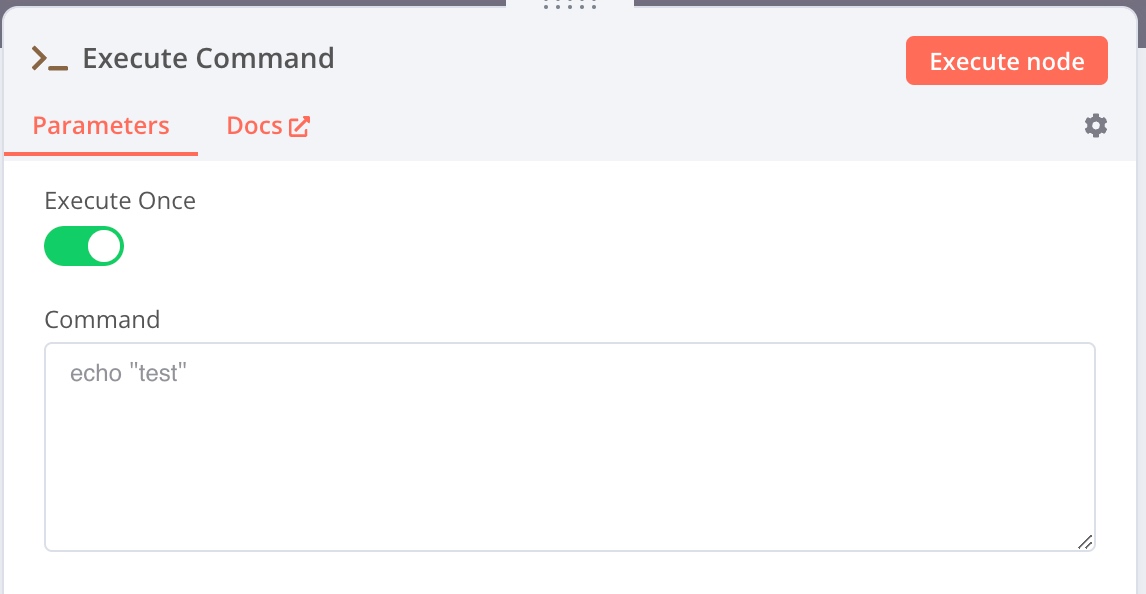
Next is the Execute Command node, my most frequently used node. Here, you can execute any Shell Script that you need. This node also has a special function that will be introduced later.
Then there are various control flow nodes for branching, looping, etc.
Lastly, application-specific nodes can interact with various apps to gather information. For different applications, separate login credentials need to be set up.
These nodes enable script programming in a visual way and meet our diverse needs.
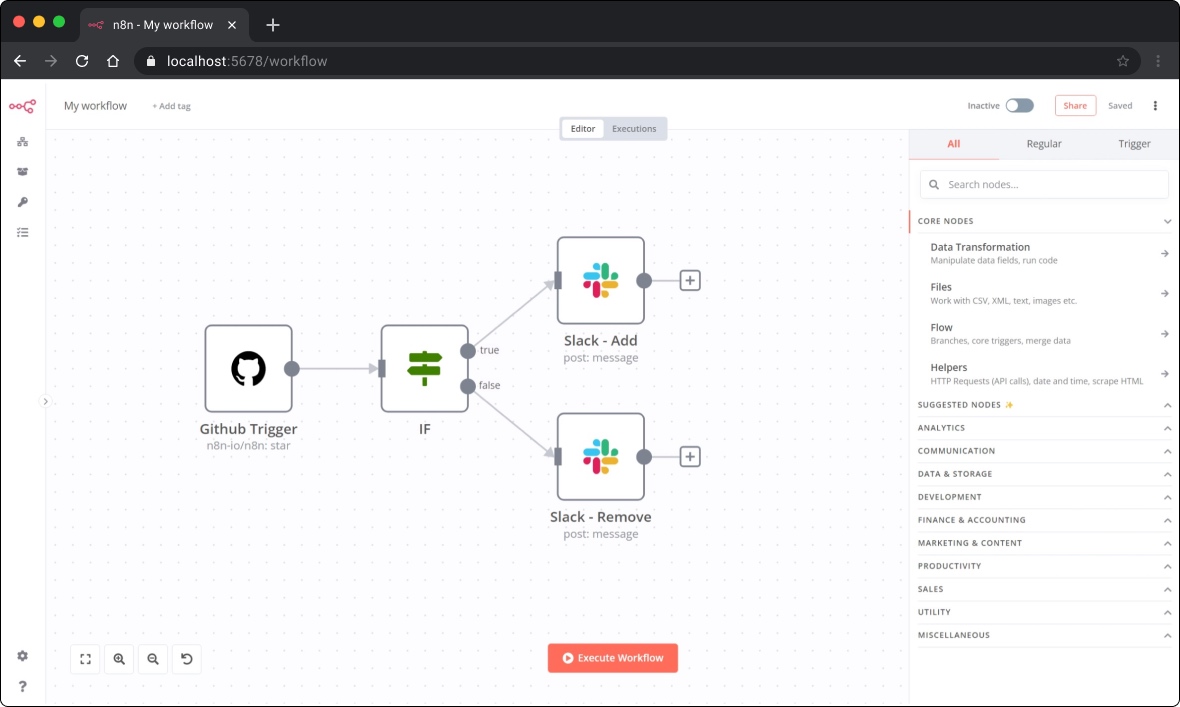
From TickTick to Notion
Next, let’s delve into the main topic: How I’ve organically combined ‘TickTick’ and ‘Notion.’
First, the most challenging problem was ‘how to log third-party applications into TickTick.’ TickTick’s official API is quite outdated. Although https://developer.dida365.com/docs#/openapi outlines methods for secondary authentication that can authorize using n8n’s secondary authentication module, it cannot normally read information and task lists. Moreover, the official website’s API does not seem entirely functional.
For this, I investigated some third-party tools based on TickTick and made some gains:
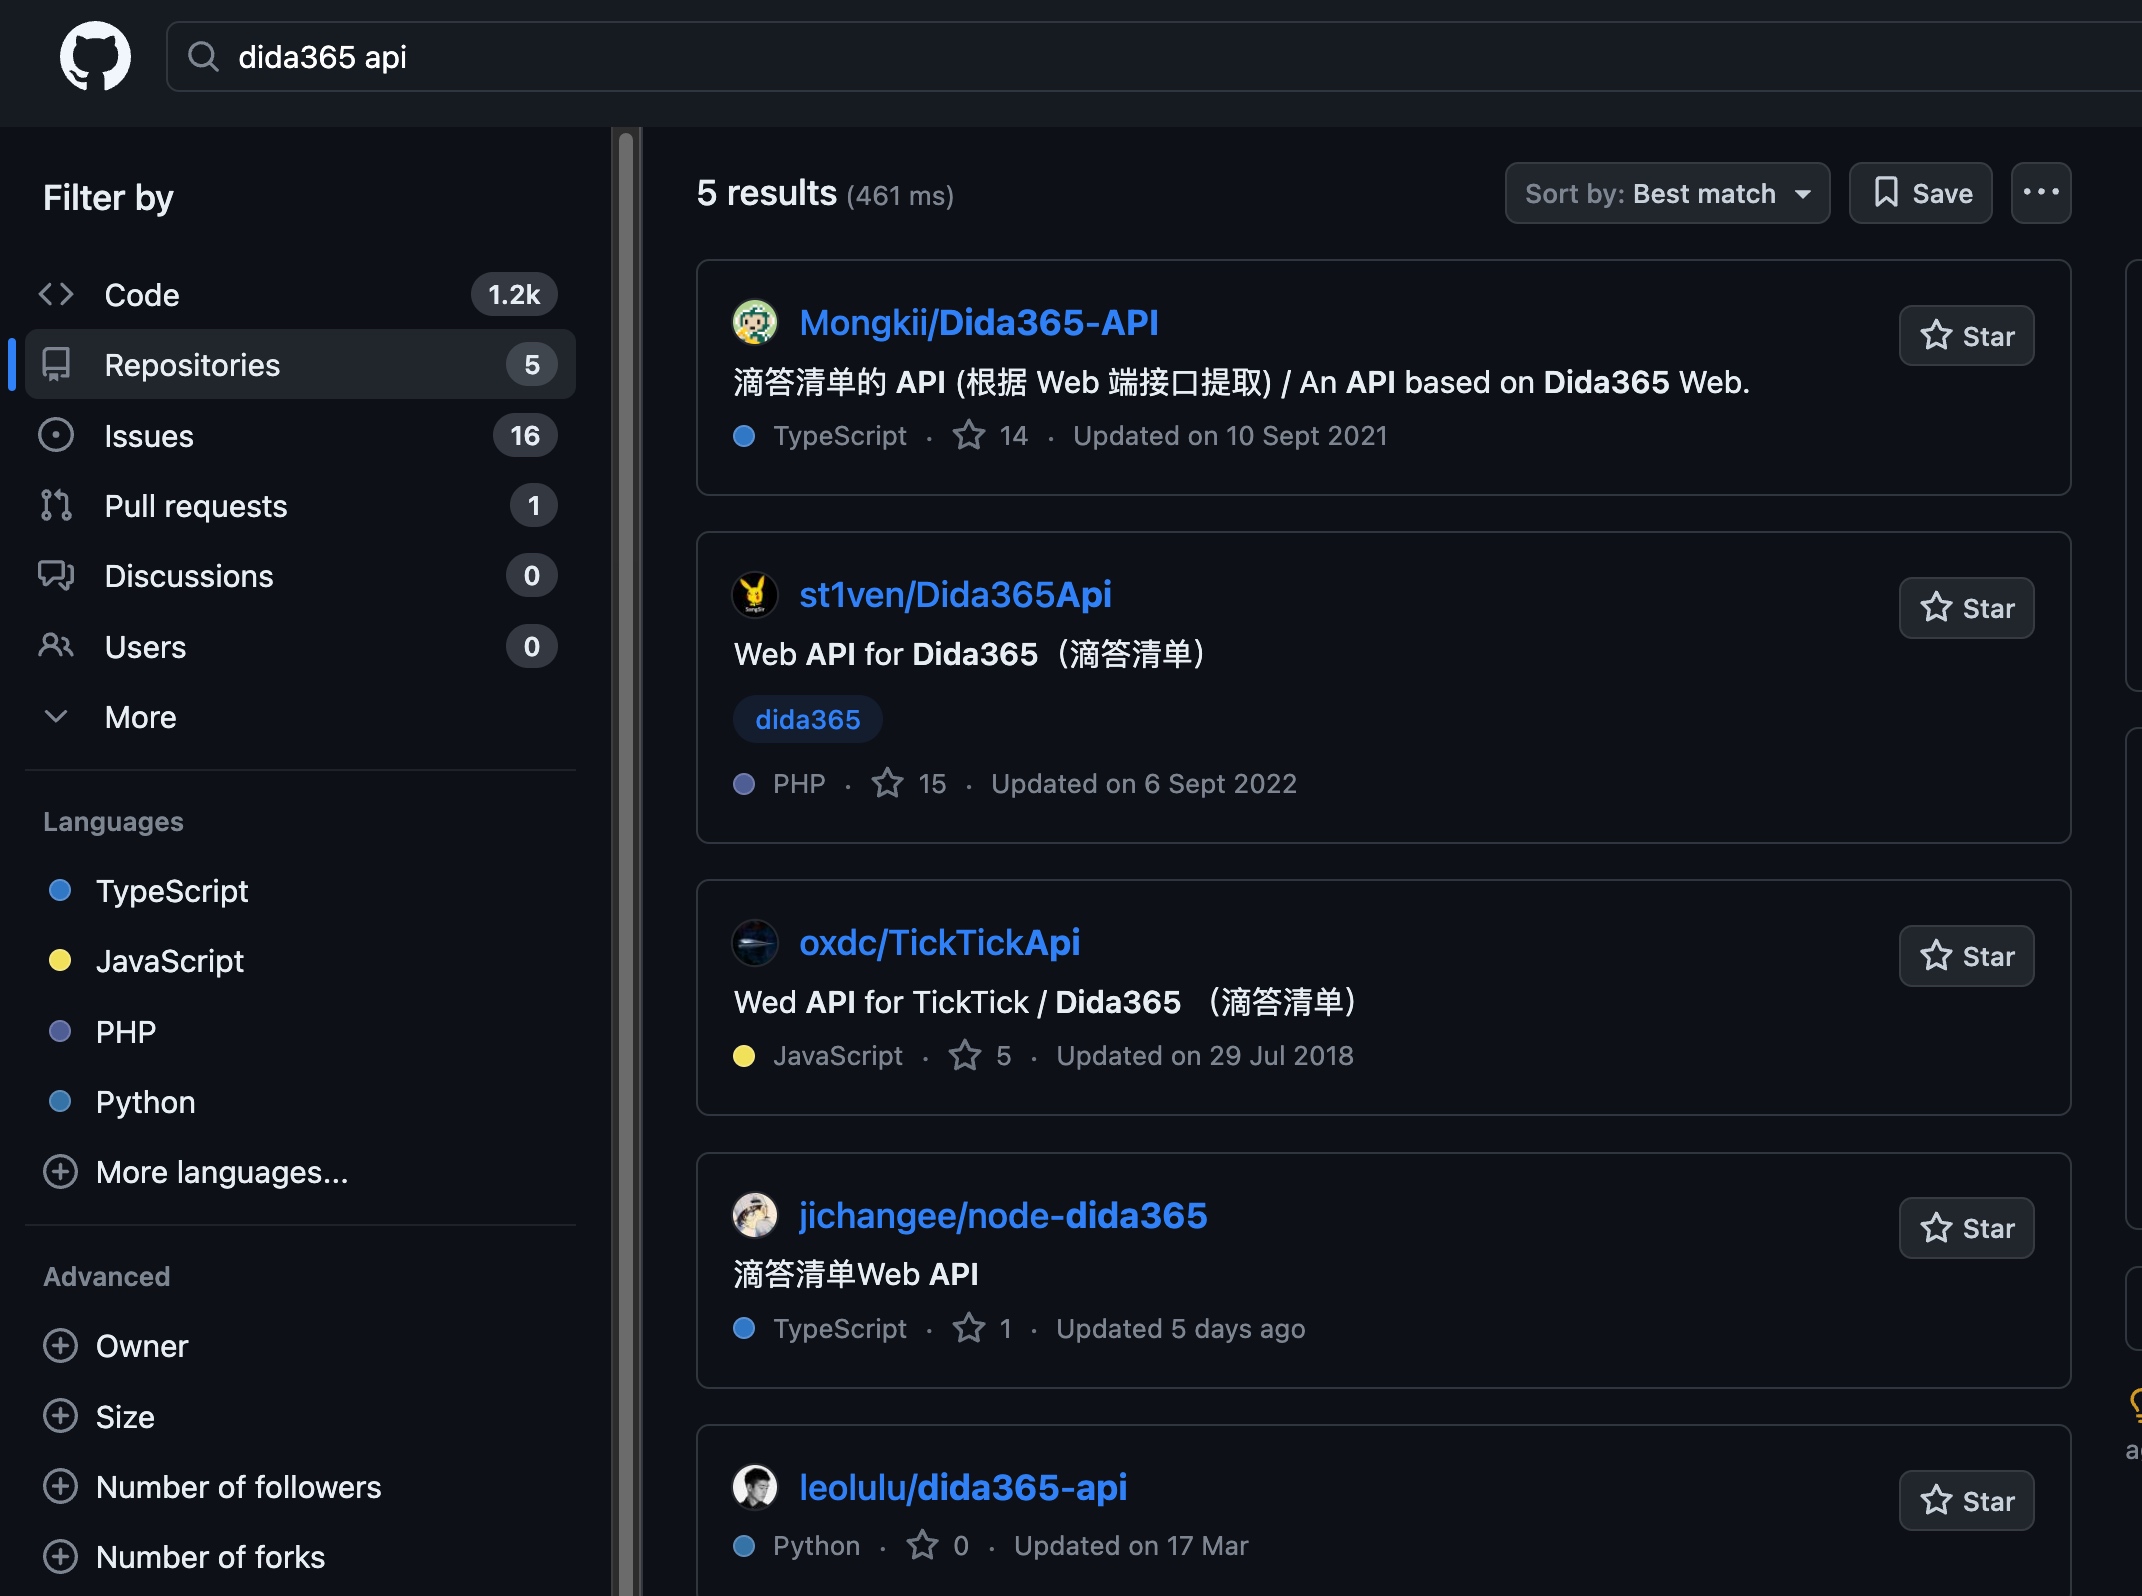
Searching for Dida365 and API on Github, I could copy homework. In short, using a username and password to log in and obtain a token, and then including the token as part of the header in the Cookie, one can edit and query TickTick’s tasks.
Login Workflow
First, I set up a Workflow exclusively for logging in. Since a Cookie can be saved for a while after logging in, we can use this mechanism to reduce login frequency and avoid being banned by TickTick.
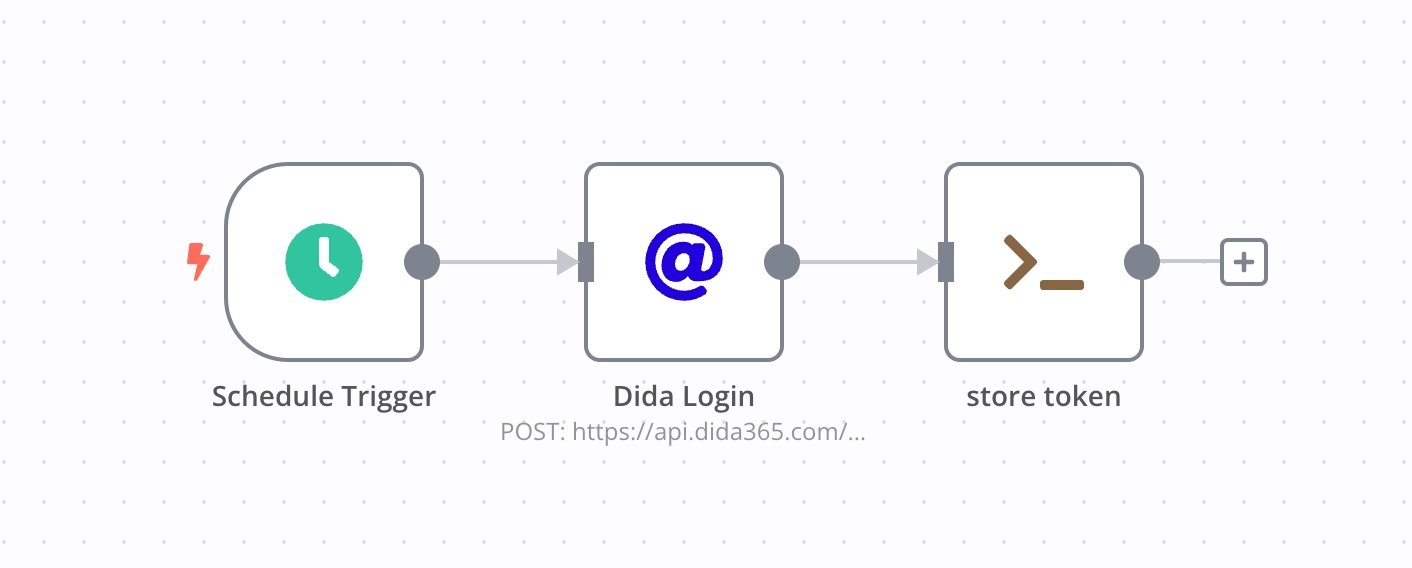
The first node acts as a timing trigger. I trigger this Workflow at 8 a.m. daily, storing my token for all other Workflows to use throughout the day.
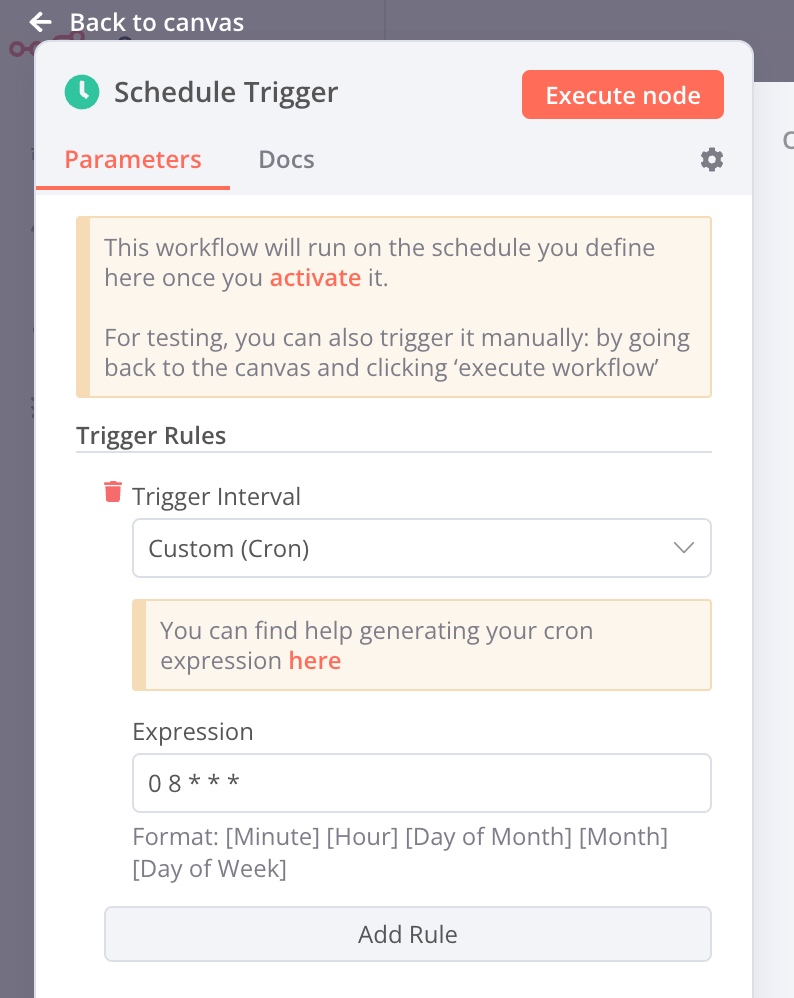
Here, you can use the Crontab timing setting mode. Crontab guru can help you understand the specifics.
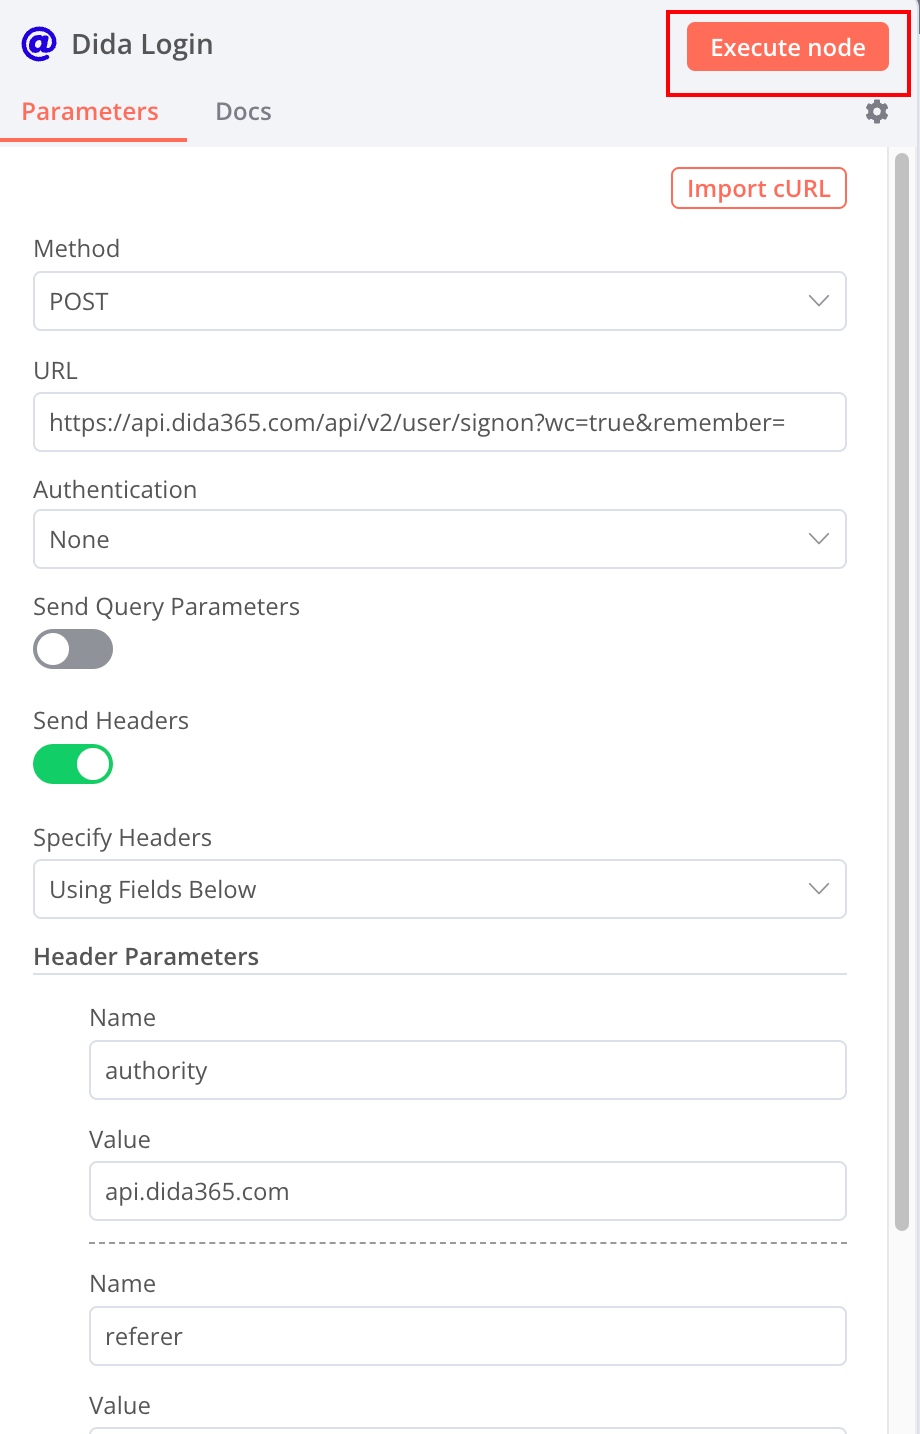
Next is the login node. Add an HTTP node.

Set the API and header information as shown above.
Note the URL: https://api.dida365.com/api/v2/user/signon?wc=true&remember=true. The screenshot isn’t complete.
The header information is:
- authority:
api.dida365.com - referer:
https://dida365.com/webapp/ - origin:
https://dida365.com
1 | |
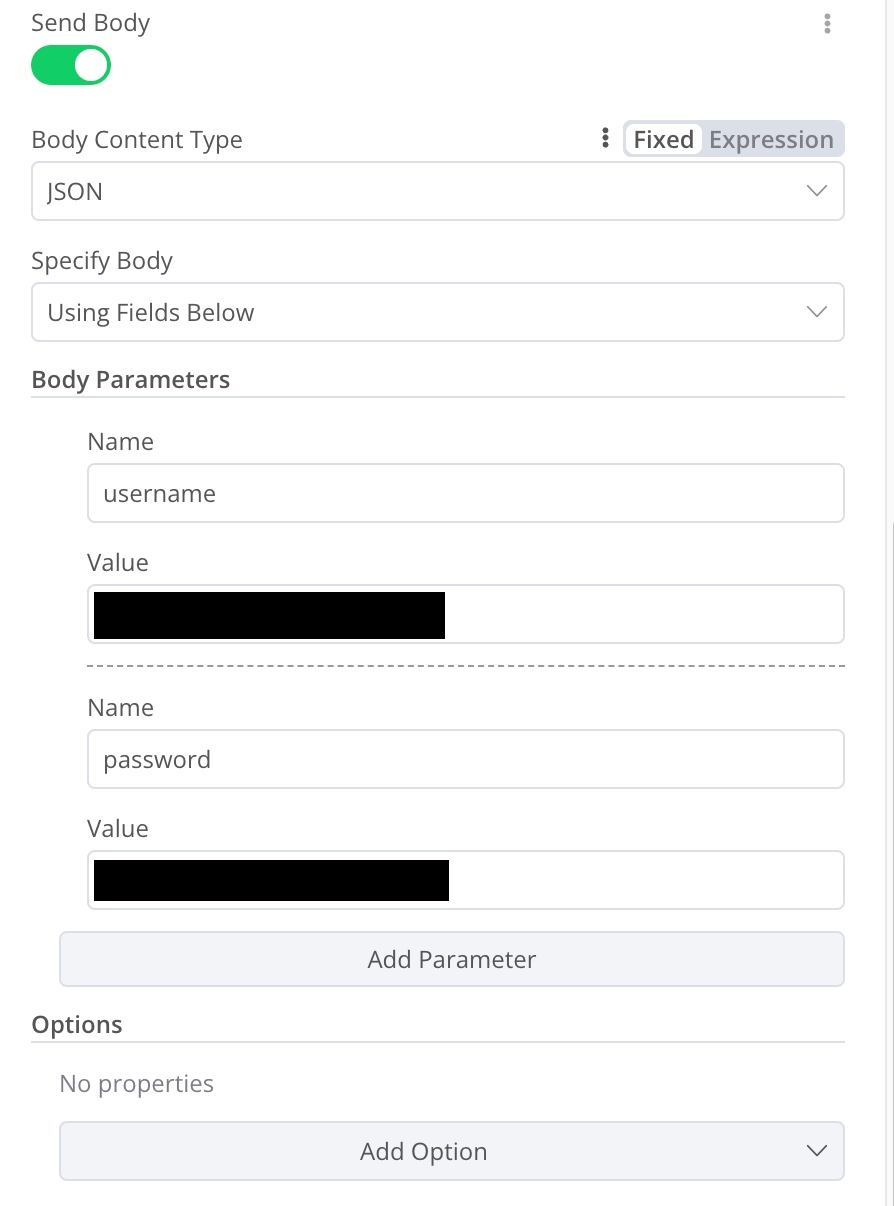
I parsed this from a cURL and just used it as is. Then, tick Send Body, set the Json type, and enter TickTick’s username and password, with the username being a phone number or email.
After setting up this node, you can conduct some simple tests. Every node in n8n has an Execute node button. You can execute each node individually for debugging.
The test results can output to a table or be viewed in json format.
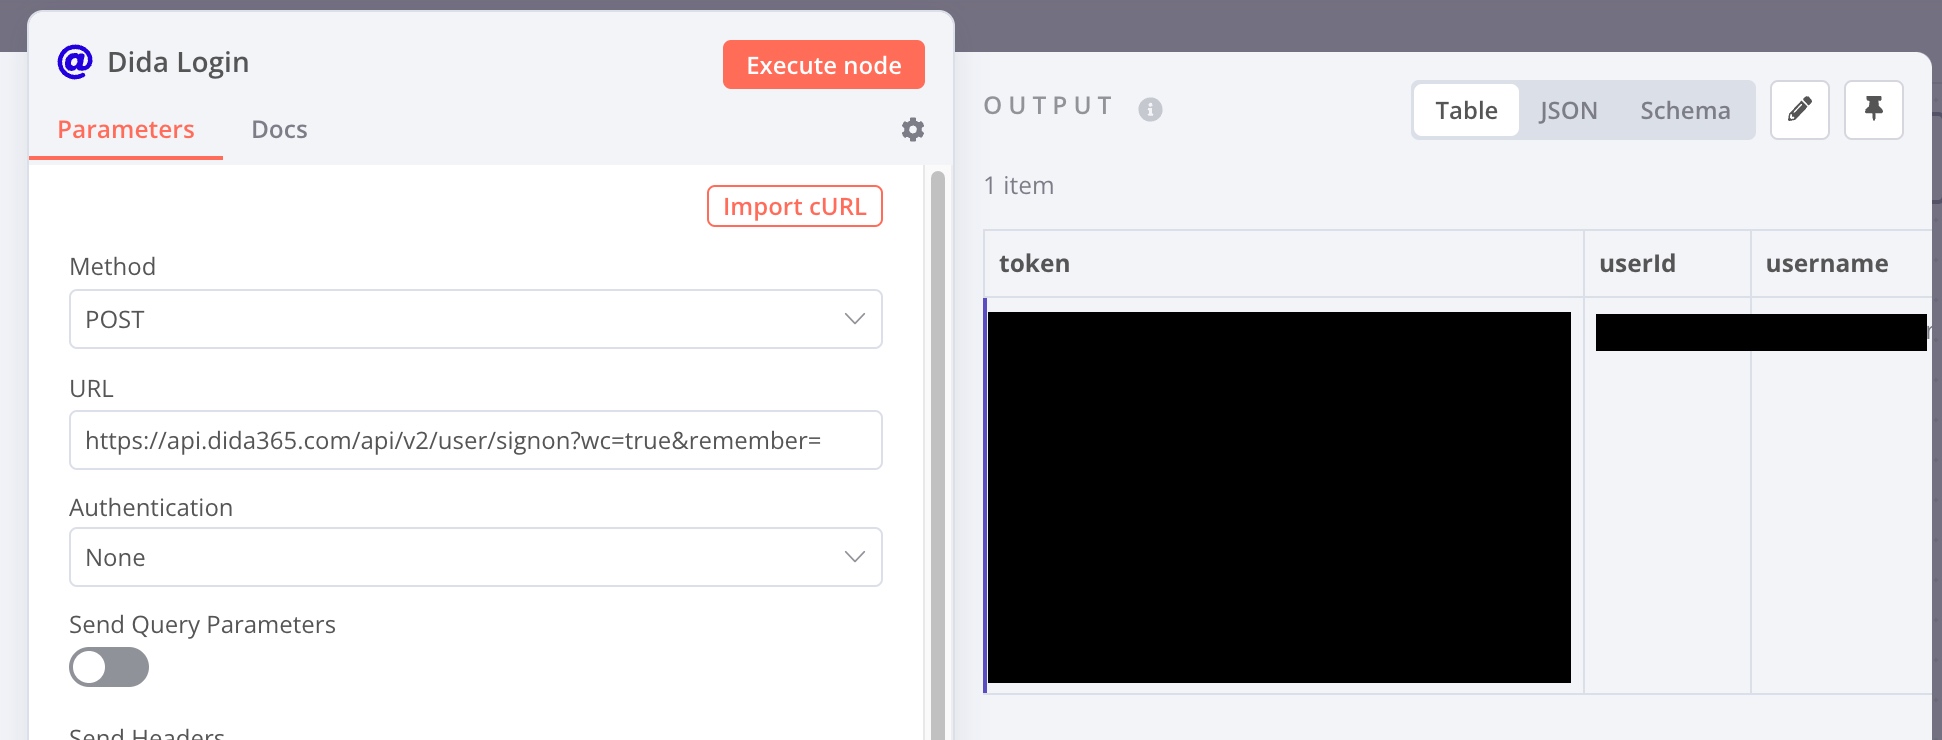
Here we have successfully retrieved the token we need.
So, how can other Workflows use this token? Here we need to use n8n’s special design: the Execute Command node. Execute Command is equivalent to running a Shell script provided by us within n8n’s runtime environment (here, our docker container). This Shell script can directly access various directories within the docker container, such as /tmp. We can write various variables into files in the /tmp directory, thus using them as ‘global variables’ for use across different Workflows.
Therefore, I dragged the token into the edit box (dragging the header can directly drag variables), or I could just enter:
1 | |
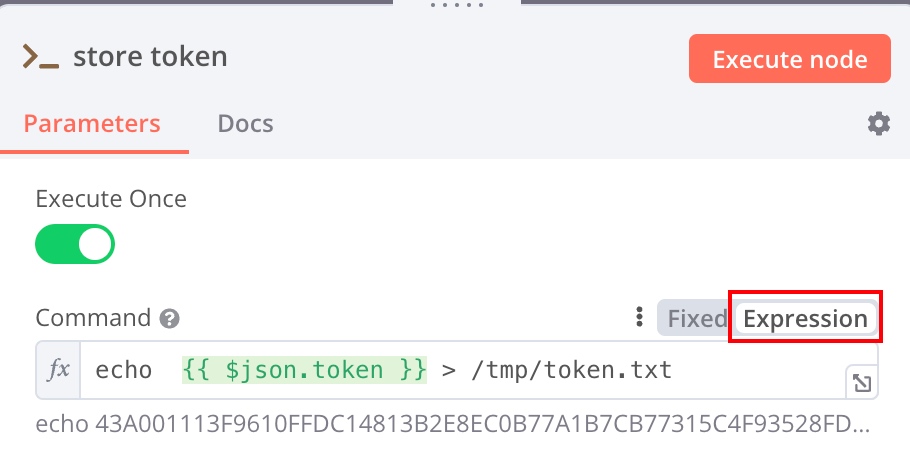
Note here, if using variables, you need to change the content type from Fixed to Expression. This way, the token is stored in the /tmp/token.txt file. The next time it’s needed, using an Execute Command node to read the file’s contents will provide access to the global variable.
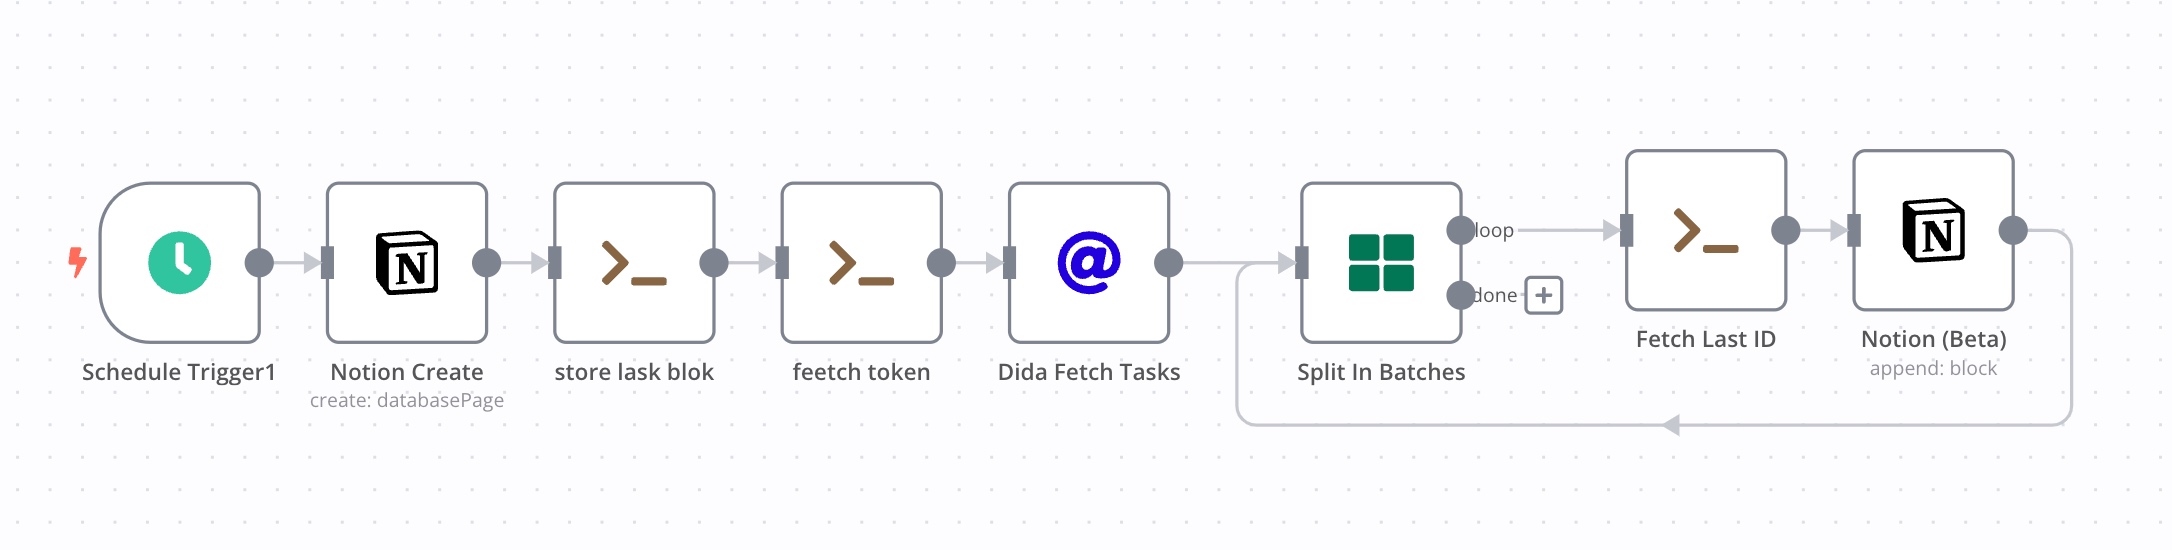
Sync Workflow
The synchronization Workflow is slightly more complex (there are some typos in the names of the scripts below, which were caused by my frustration during Workflow debugging; please bear with me).
Notion Integration
Firstly, to synergize with Notion:
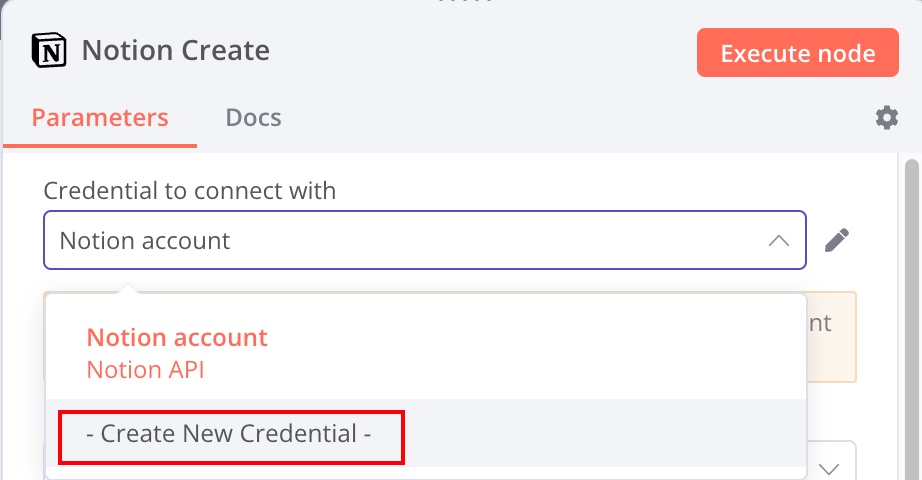
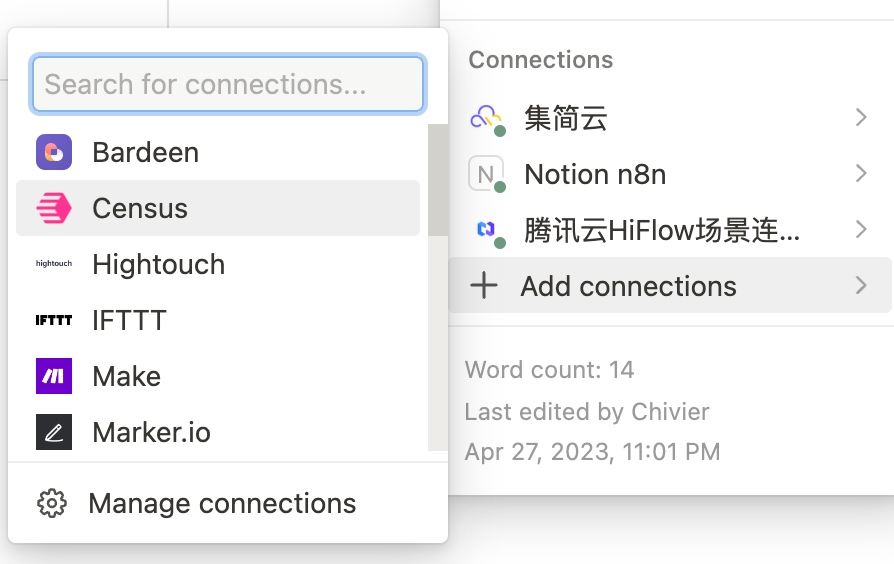
Add a Notion node within the “Add node” section, and bind your Notion account by creating new credentials. This requires cooperation with the Notion API, necessitating the creation of a new integration on the My integrations (Notion.so) page. After successful creation, copy the token from Secrets:

On the earlier page, you can edit the token’s permission scope with Capabilities to suit your needs. Remember to connect your Notion page with the integration afterward:
This introduction is somewhat cursory. For detailed creation methods, refer to: Create a notion integration.
With the Notion API’s support, n8n can automate a series of actions, such as creating and editing pages.
Creating a Page Node

Notion nodes allow the addition of Blocks. After creating a Page, I conveniently added an H1-level title for the Daily Report.
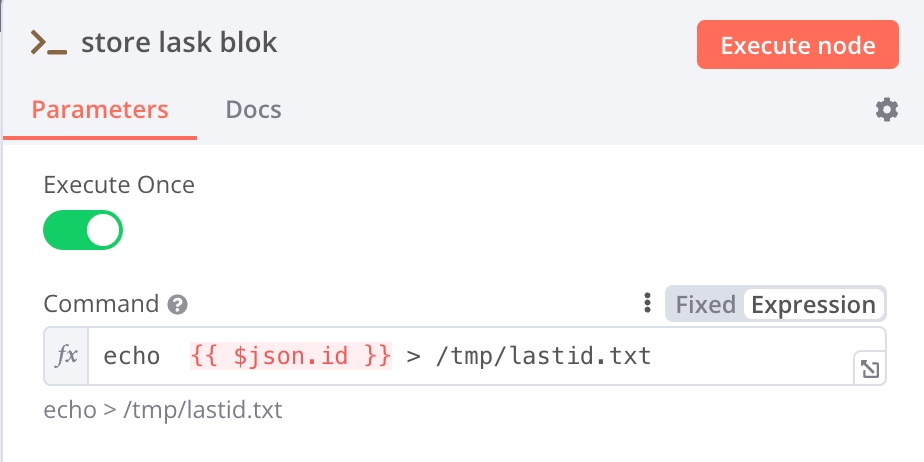
Storing the Notion Page ID
Once the Notion Page has been created, it generates an ID. As subsequent actions will involve editing the page, and since Notion page retrieval is not convenient with n8n’s nodes, I opt to store the page information directly.
1 | |
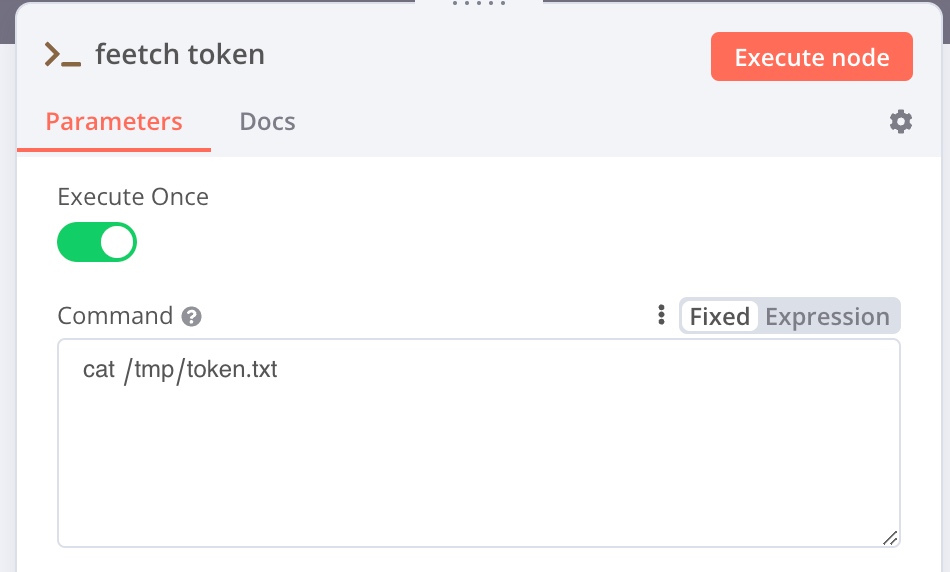
Retrieving the TickTick Token
Retrieve the token information from another Workflow.
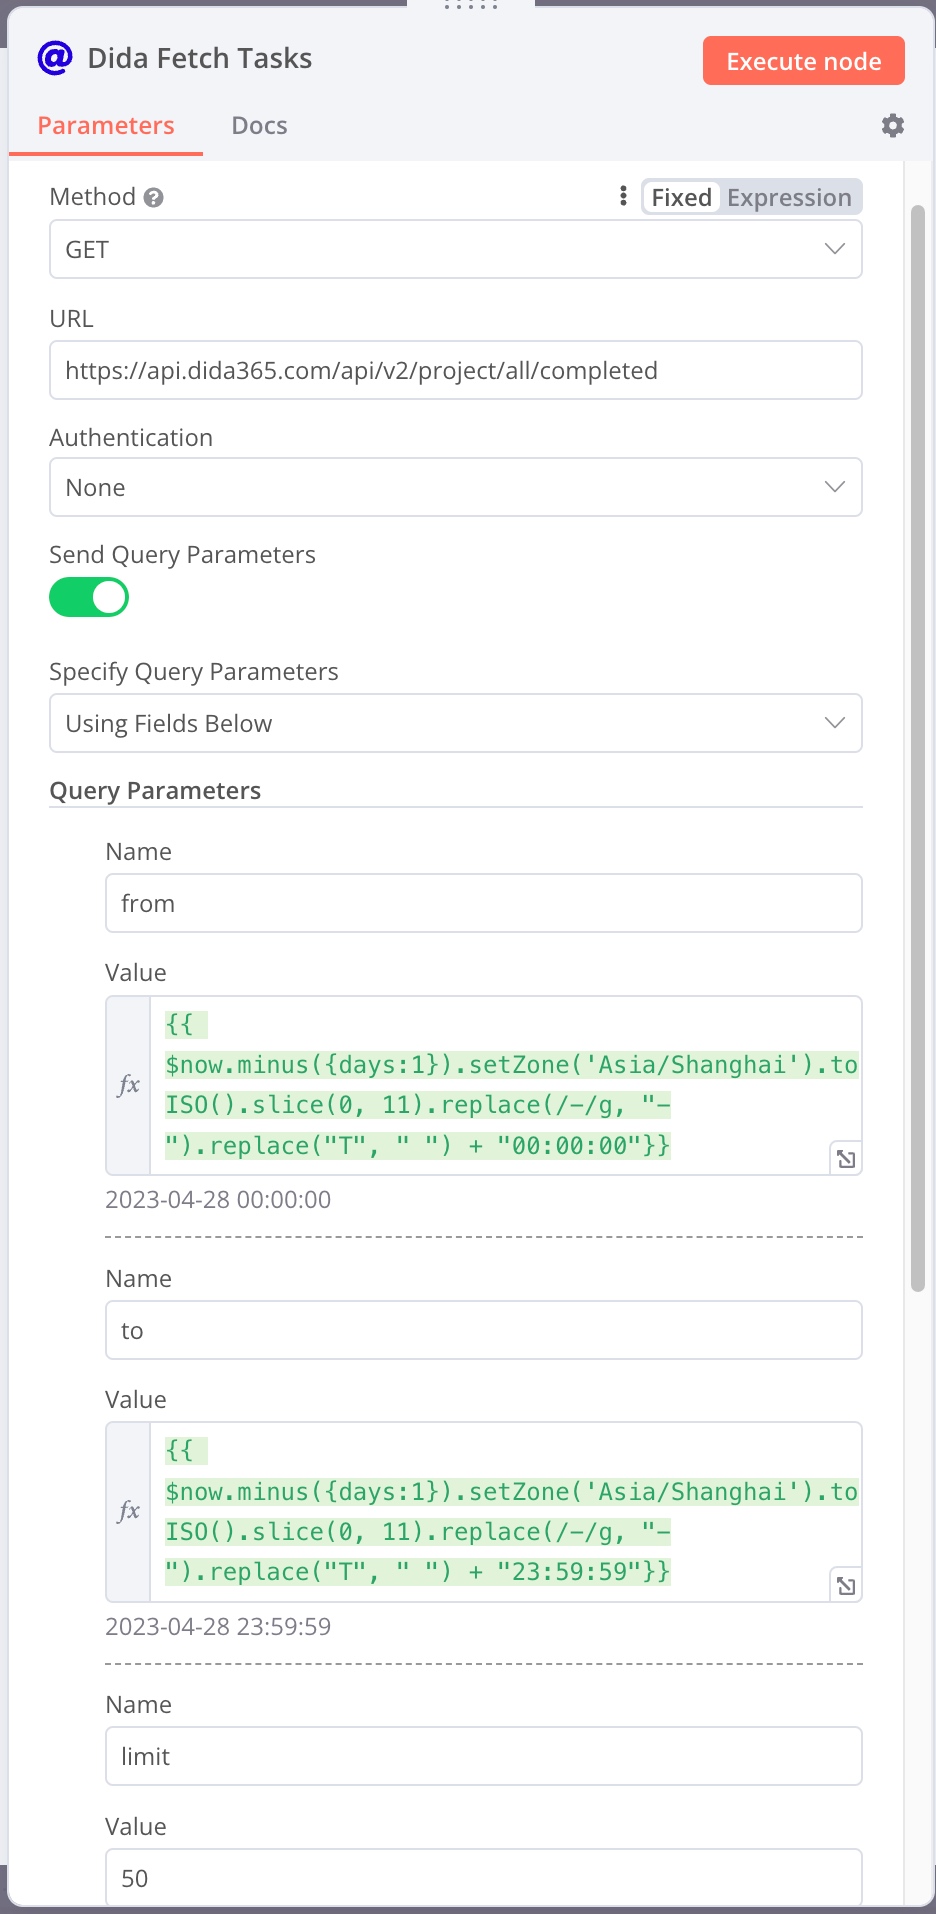
Retrieving Today’s Task List
For the URL part, Query Parameters are used to limit the scope of the query, solely retrieving tasks completed yesterday, which can be reconfigured to meet personal needs.
URL: https://api.dida365.com/api/v2/project/all/completed
from: {{ $now.minus({days:1}).setZone('Asia/Shanghai').toISO().slice(0, 11).replace(/-/g, "-").replace("T", " ") + "00:00:00"}}
to: {{ $now.minus({days:1}).setZone('Asia/Shanghai').toISO().slice(0, 11).replace(/-/g, "-").replace("T", " ") + "23:59:59"}}
limit: 50
The header section must include the previously obtained token within the cookie.
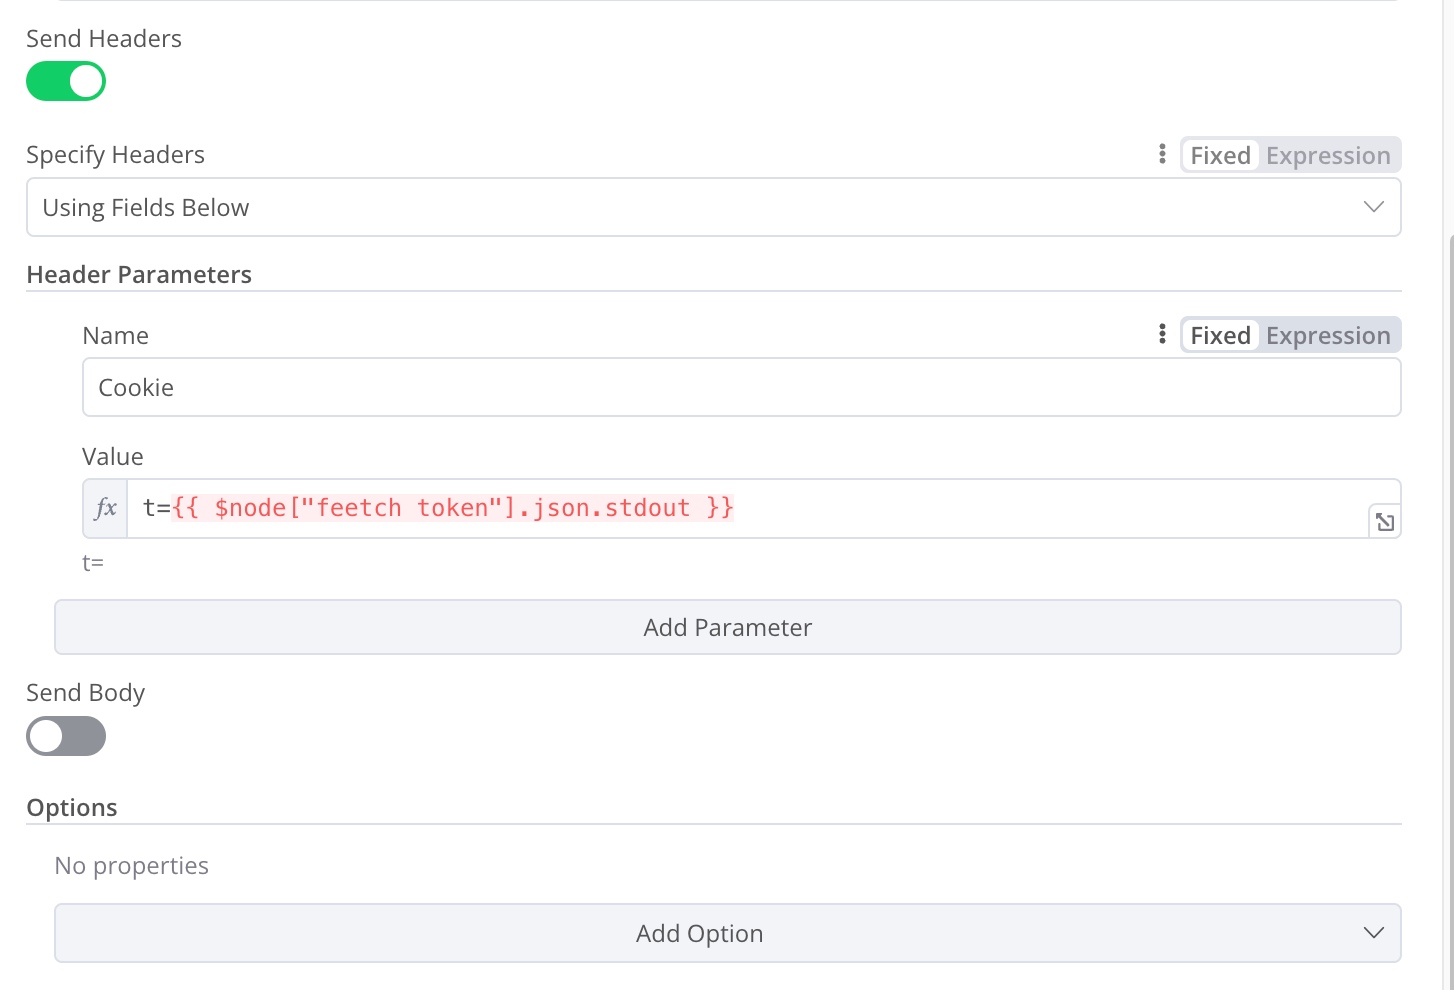
Using $node["node name"] retrieves the output of a specific node as long as the node names are consistent (please ignore the typo here).
Split in Batch Node
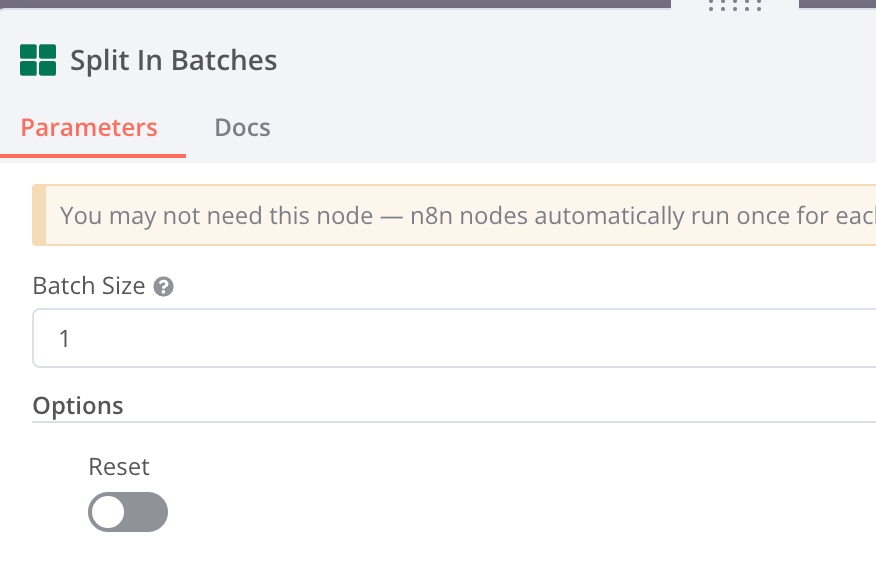
Enter 1 to write information about a single task to the Notion page each time. This node sequentially sends the recently gathered data into the next node.
Retrieving Notion Page ID
Retrieve the notion page id from earlier:
1 | |

Writing Task Information to Notion Page
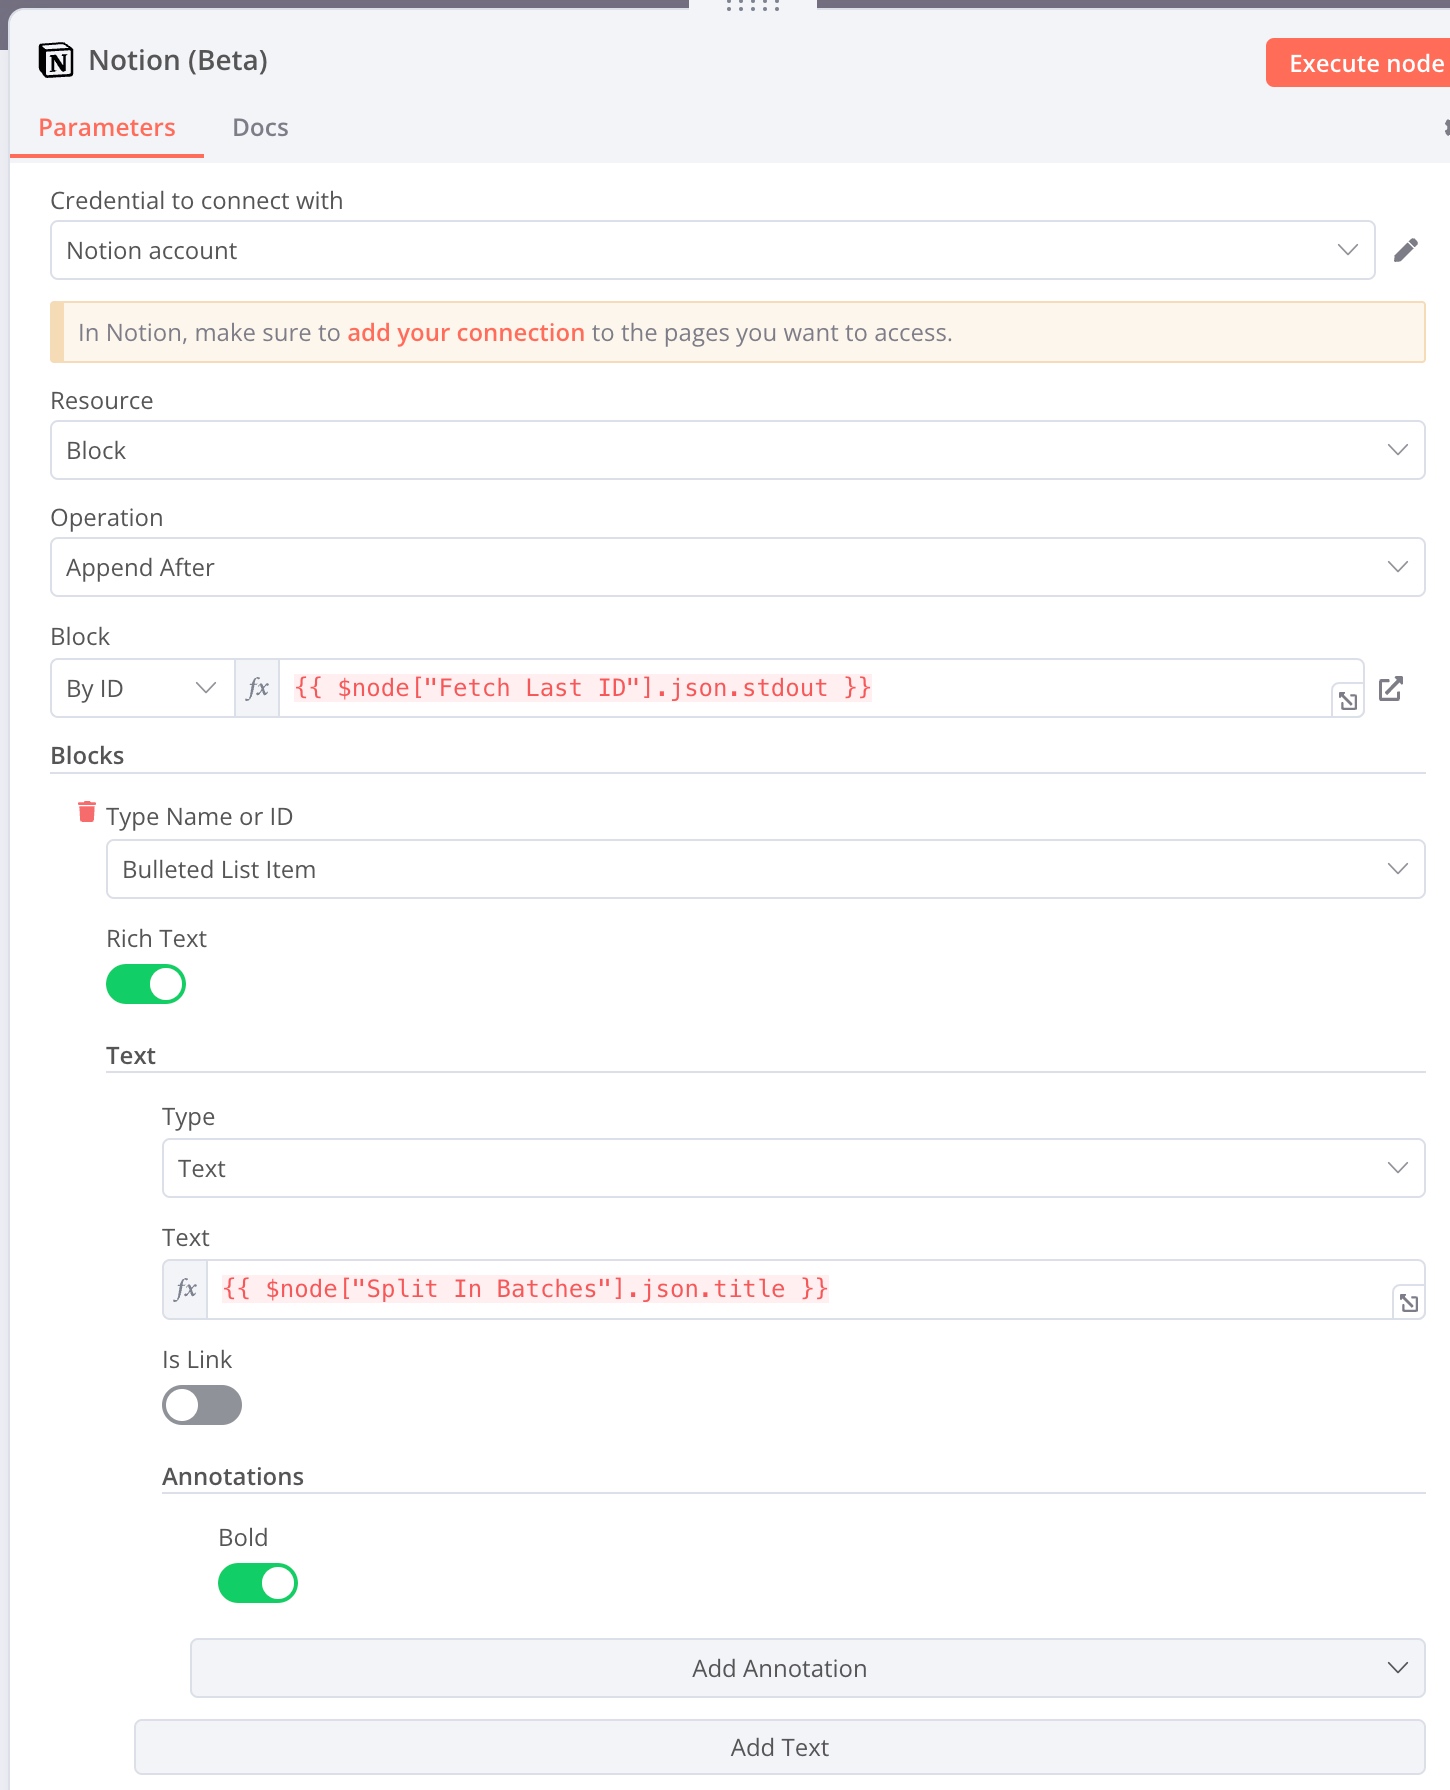
This section uses information from multiple nodes and needs some restriction. Dragging input sometimes does not import data correctly, defaulting to data from the closest previous node (an n8n bug, which may be fixed later), so it’s necessary to manually edit and differentiate data from different nodes.
- Block:
{{ $node["Fetch Last ID"].json.stdout }} - Task Text:
{{ $node["Split In Batches"].json.title }}
Once the page is linked and activated, by 8 a.m. daily, I can see my task report from the previous day while at work.
Further Possibilities?
n8n has organized and simplified many internet products that support APIs:
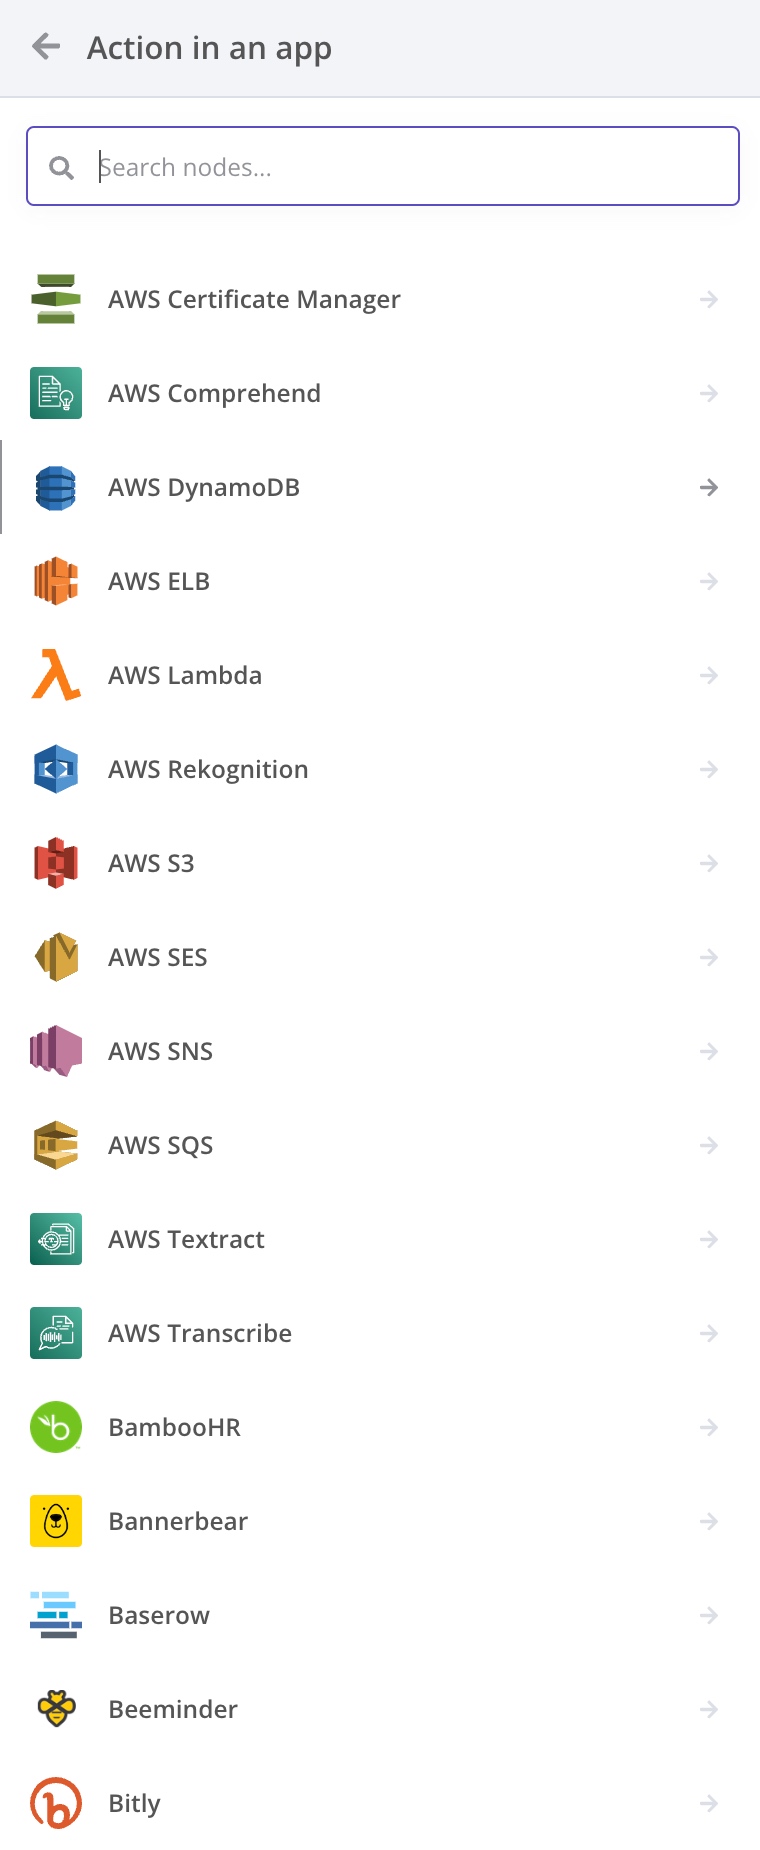
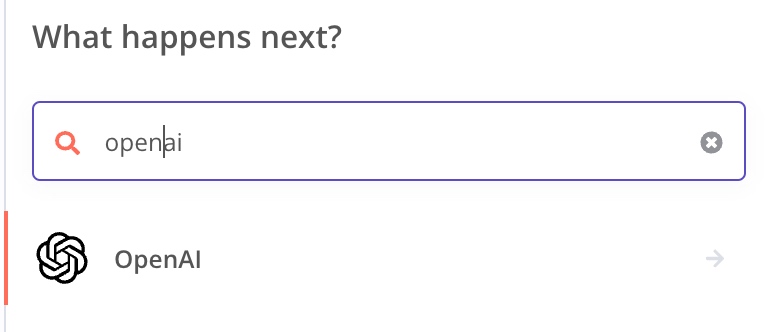
In the rich API library, I inadvertently discovered that even OpenAI has its dedicated node:
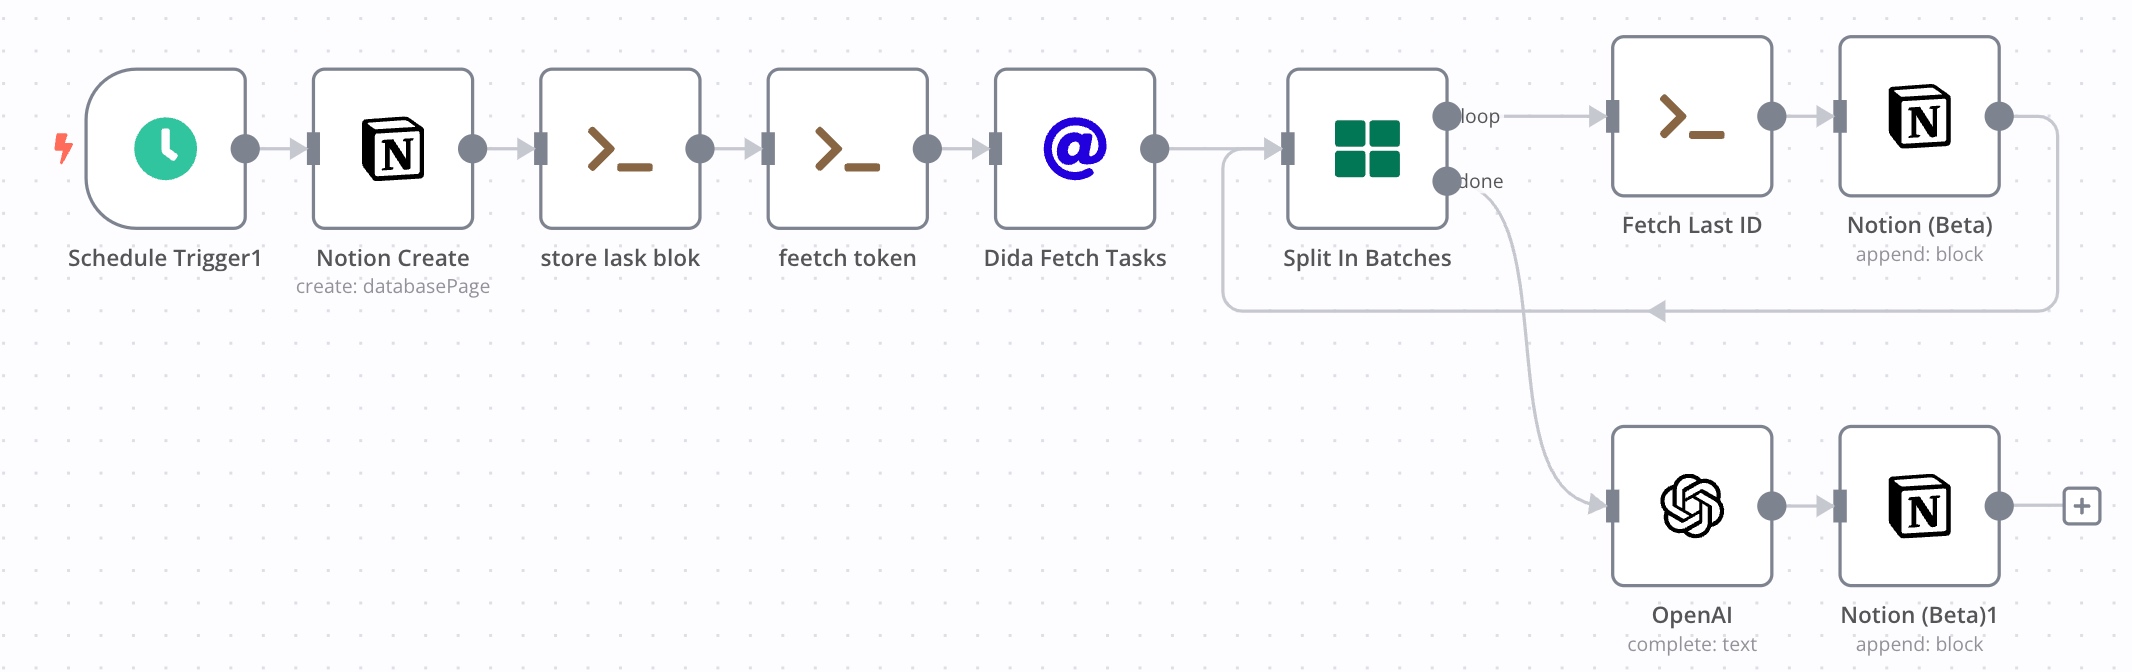
Returning to the question posed earlier in the article, how to seamlessly integrate AI into one’s workflow. The above-mentioned task process can be slightly enhanced. After the Split in Batches node concludes, OpenAI can help me write a summary, which is then written back into Notion:
However, in this Workflow, the entertainment value of AI overshadows its utility. I’m not particularly interested in the generated reports. Yet, this also shows me more automation possibilities, namely deeply binding AI with my workflow to achieve previously unimagined automated workflows. For example, I can use AI to extract weekly reports from some RSS subscriptions and write them back to my Notion; automatically search for topics of interest and add them to Zotero; automatically export notes from articles I’ve read in Zotero into Notion. The community also has templates that can transform one’s email inbox into a smart customer service using AI. More uses await discovery and contemplation.
Essence and Reflection
In retrospect, although n8n looks sleek and simple, all the above Workflow processes could be accomplished through direct scripting. Applications could also call their APIs using HTTP; likewise, HTTP Requests could use curl commands within Execute Command nodes. Therefore, I see n8n relating to scripts as Jupyter relates to Python. In my view, compared with traditional script editing, n8n has the following advantages:
- Provides a modular editing environment for an intuitive, quick understanding of a Workflow’s purpose, allowing for step-by-step script editing.
- Offers convenient debugging, with the ability to execute each node independently to view output.
- Simplifies editing by dragging output from preceding nodes directly into the current node as input.
- Facilitates management, enabling the swift toggling of Workflows on and off.
- Eases sharing (built-in sharing features require payment, but json files can be exported and shared with others).
- Streamlines processes, significantly reducing the workload for secondary and complex authentications directly using n8n credentials.
- Global variables, using Execute Command to store information in specific directories for temporary variable effects.
Compared with other existing API tools on the market, n8n’s powerful extensibility and customization are currently irreplaceable. For example, global variables can be achieved by writing to files with Shell; python and more command-line tools can be installed in docker to enhance the usability of Execute Command; npm can be used within docker to extend JavaScript nodes; and different Workflows can call each other. These features are currently unavailable in other API tools.
Despite n8n’s immaturity and the many bugs I’ve encountered – such as OAuth2 passing validation but failing to access data, Notion occasionally losing Block IDs, and Webhook triggers potentially failing – the community is actively working to improve. Compared with other API automation tools, n8n has already achieved a dual dominance in price and function. n8n doesn’t mind my lack of wealth, and I won’t mind its abundance of bugs.
After writing this article, I revisited the different scenarios in my work. My knowledge base serves as the foundation, with various tools as the trunk and branches. In this arboreal framework, AI tools are newcomers. By building nests on the branches with API tools, they can perch upon my workflow, injecting new vitality and dynamism. Although the fruits of my future work are uncertain, I will always cherish my work and career, ensuring my professional tree remains evergreen and vibrant.